Radiator & Fan Upgrade

My car runs hot on the hot side because of the extra heat generated by my twin turbo set up. It’s totally within the “normal” range but the cooler your car runs the more power it’s going to make. And in the future none of my plans involved less heat so it was time for another upgrade.

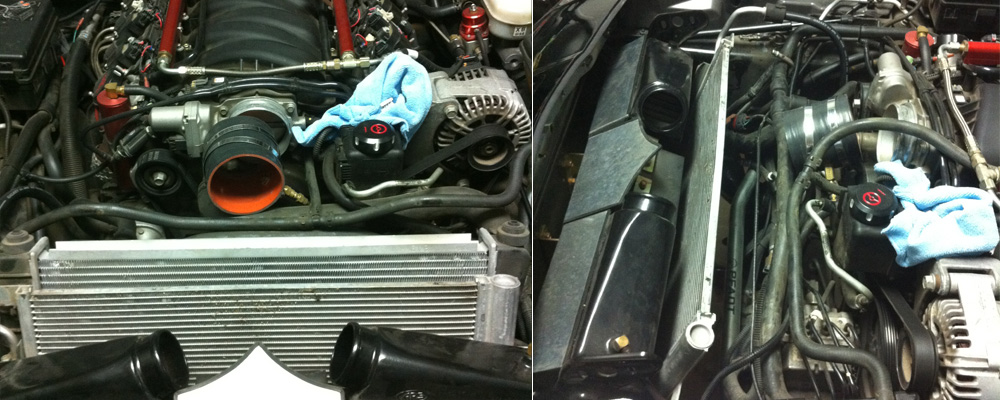
I pulled out the old radiator and was shocked at how small it was! It was hard to believe it was doing much to cool the engine. A bigger radiator would definitely make a difference. Notice how little room there is in the engine bay even with the radiator out (this will play a role in my install later here).

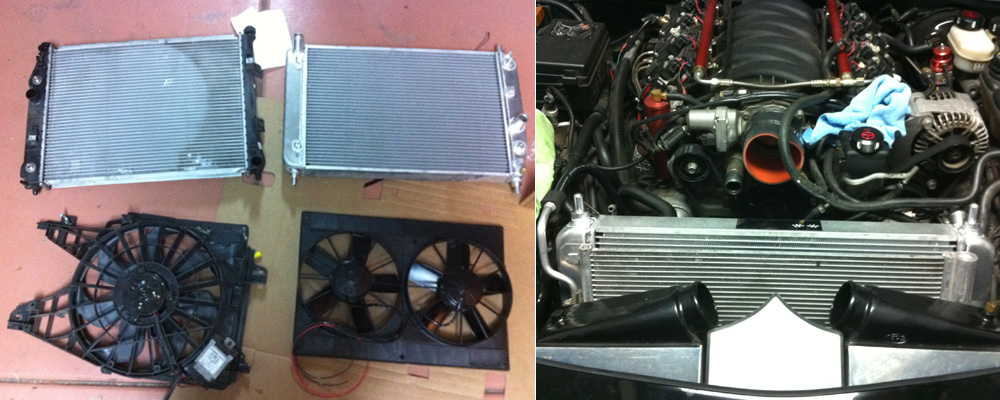
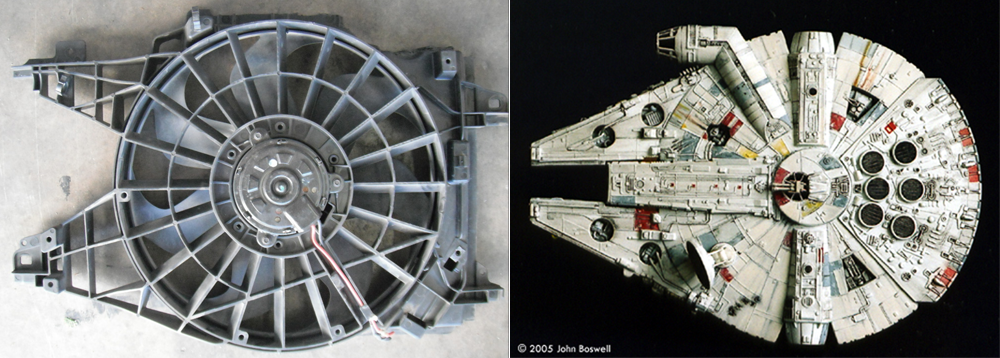
After some research I picked Dewitt’s direct fit aluminum radiator. They also offered Spal’s dual 11″ fans so I got them as well. You can see the old radiator & fan (left) next to the new set (right). The Dewitt radiator is incredibly thick compared to the stock radiator (two rows of 1″ tubes as opposed to a single row). The dual fans cover more surface area and provide more balanced cooling (every little bit helps).

The Spal fan attatches to the Dewitt’s radiator via a pair of brackets. With the help of my buddy Justin I tried to install the radiator & fan bracketed together but it was simply impossible. We put the radiator in first and then tried to slide the fan in, but it was a no go- there simply wasn’t room. In a normal set up there would be a lot of room in the front (you’d just temporarily pull out the air filter / intake) but my intercooler occupied every last bit of space. So we decided that the fan would have to go in from the bottom.

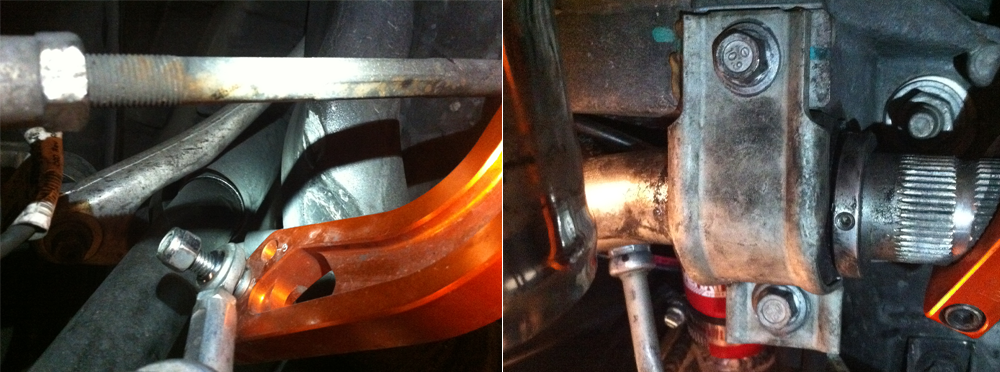
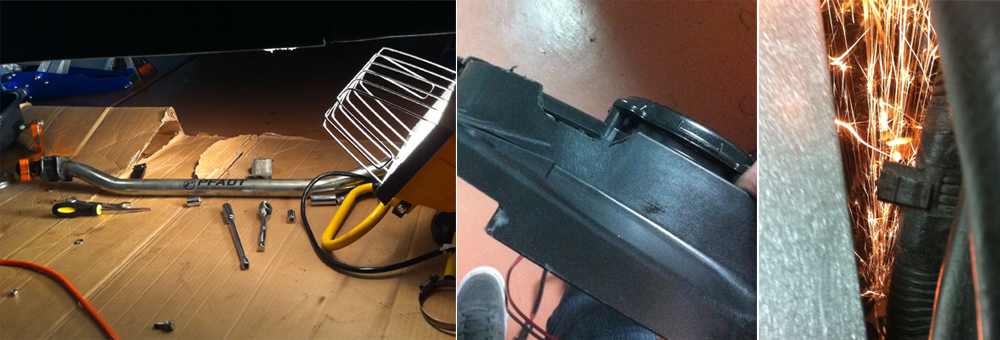
Going in through the bottom meant that I had to take out my PFADT swaybar. Taking out a sway bar isn’t a big deal (maybe a little annoying)- just remove the nut & bolt from the sway bar arms (they are generally not under tension). Next remove the two bolts from the two brackets that hold the sway bar onto the chassis. I had to to undo some of my turbo piping underneath the car too.

Once the sway bar was out it became apparent that the fan wasn’t going to go in easily from the bottom either. There is a bolt that comes off the ABS unit and it was in the way. The first thing I tried was cutting out part of the fan casing (you can see a notch in the pic below- I ended up having to cut out a more than that). The blades still hit a little so we ground off some of the offending bolt. That seemed to do the trick and we were able to push the fan up in place. It was tricky to get the brackets back on after the radiator & fan were installed but we managed. We spliced the Spal fans into the stock fan controller. I’ve heard arguments that this is okay and that it’s not okay. So far no issues (if a problem develops I’ll switch to a relay controlled system). Once the car was all back together we filled it up and drip… drip… drip…

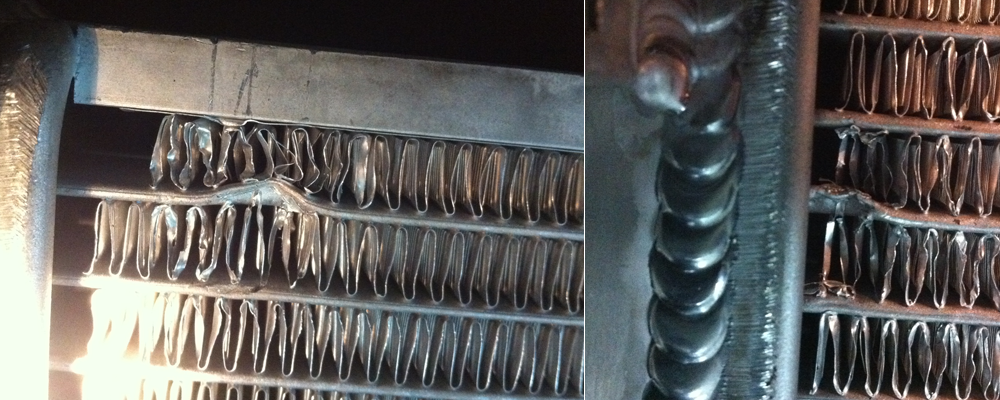
Whoops! The radiator had a leak. We pulled everything back out and inspected the damage- it wasn’t bad, but we had clearly poked two holes in the cores. It was immediately obvious what had happened- the back of the fan unit has some pretty sharp edges and they had smashed the cores as we finagled the fans in. I emailed Dewitt’s are they were very sympathetic and had me send the radiator in for repair.

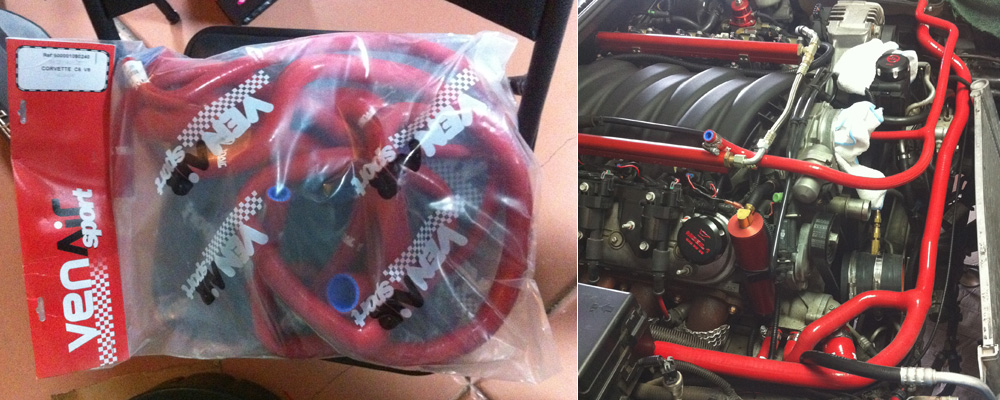
Since I had some time on my hands I decided to replace my old radiator hoses (some of them were looking pretty worn out). I picked a set of VenAir red silicone hoses to add some contrast. Everything went on with no issues except one of the heater hoses- it was just too small. I wrested with it for a long time before I gave up and contacted the seller. Turned out it was the wrong hose (Custom Corvette Accessories sent the correct hose after I contacted them- they were very responsive). I think this kit is a great aesthetic upgrade.

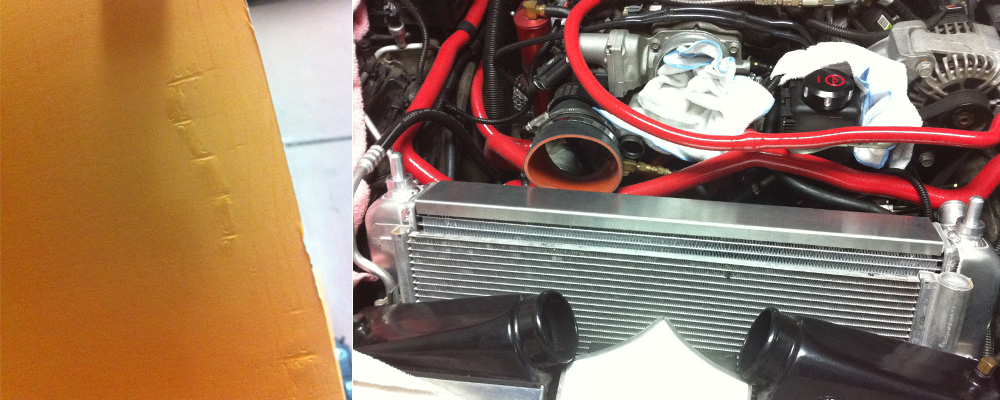
I got the radiator back from Dewitt’s shortly after the hoses were installed. They (Dewitt’s) were super nice. They did a great job fixing the radiator and they shipped it back to me quickly and didn’t charge me for the repair or return shipping! So, round two: We covered the the back of the radiator with cardboard to protect it when we slid in the fans. Even being super careful (and grinding down the sharp corners on the fan) you can see that we dinged up the cardboard quite a bit! We bracketed the units together, reassembled everything, filled it up and listened. Nothing. Sweet nothing.

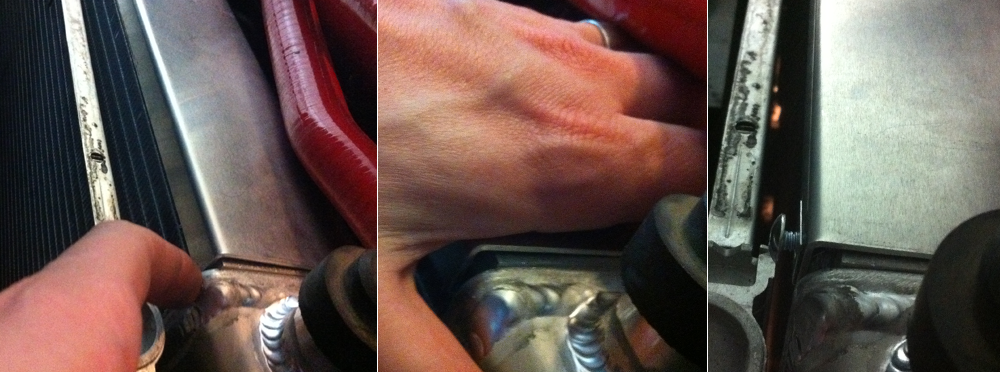
We were almost done. The last step was to fire up the car and see how she liked it. At first things seemed to be perfect, but then the fan blades started hitting that ABS bolt again. I pushed the radiator shroud back a bit and bolted it. Still hitting. That’s when I realized that the bracket that holds the fan to the radiator has slipped forward about a quarter inch dropping the fan blades back into the bolt. Not a problem- a clip, a drill and a screw later I had rigged up a way to hold the bracket back so that the fan is pulled away from the bolt. And they all lived happily ever after.

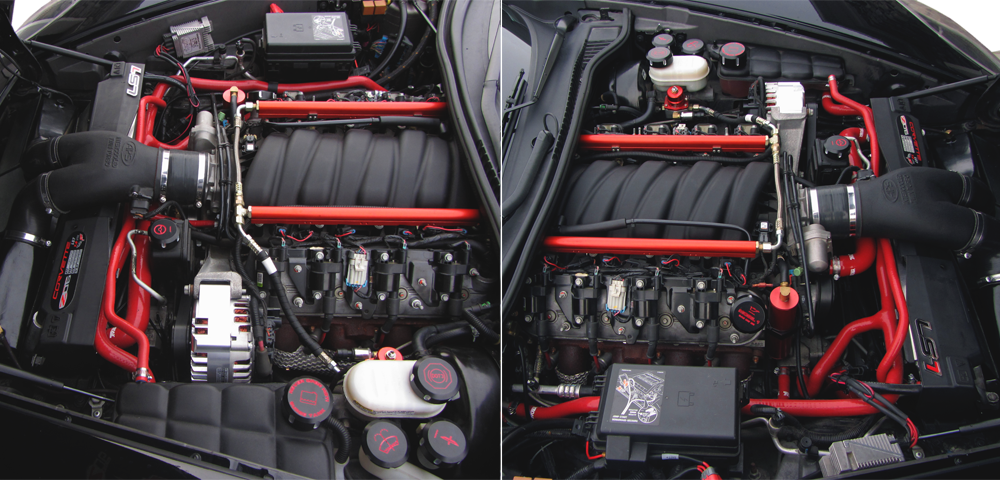
This was a fairly big project because of the sheer number of complications that arose. Total downtime was almost a month, but I think the results are worth it. So far the car seems to run much cooler (I’ll be really curious to see how it performs once summer hits). While everything was apart I took some time to give the engine a good cleaning. Here’s how she looks right now (yes, this is my car):

Not a lot of “how to” stuff in this post (I guess you could take out your sway bar if you wanted) but if anyone has any questions about replacing the radiator (or hoses) please feel free to contact me. Also, if anyone with a similar set up (front mounted twin turbos) decides to add the Dewitt radiator & Spal fan combo I’d be curious to know how your install went and what your engine temps are like. Mod on!


Posted by Cam Hughes, Feb 19, 2012

Corvette Z06 Ron Fellows Interior Upgrade

In 2007 Chevrolet introduced a special edition Ron Fellows Corvette with a black and red interior. Every since I saw a picture (here: Ron Fellows interior) I wanted that color scheme! The red and black interior colors weren’t offered on my black Z06 so I knew it would have to be a custom job. All red interiors were common enough on the C6 cars so I knew at some point I could get the red panels I needed. I created a saved eBay search (“red corvette door”) and waited. A year passed and a set of red interior trim panels popped up but the set was missing one tiny piece (mentioned below). So I waited another year and a complete set finally became available and I jumped on it.

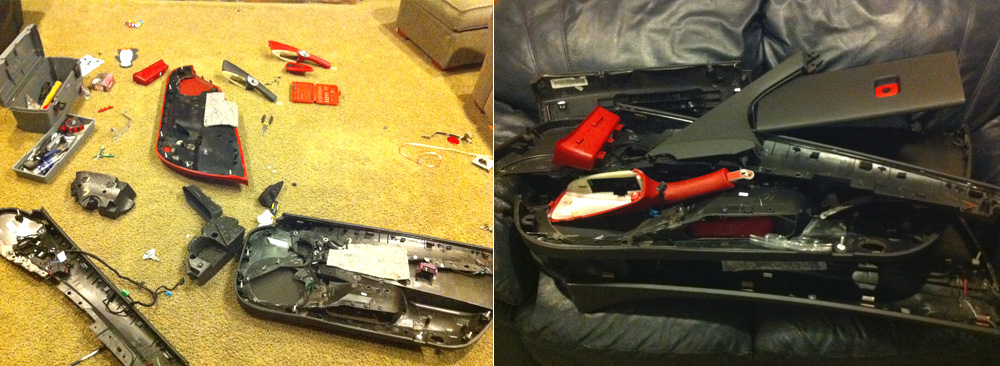
The set I got was from a standard model C6 that didn’t have some of the features I needed so I had to take everything apart (my door & the new-used door) to mix and match components. I ended up with a giant pile of spare parts. I should just chuck them, but for some reason I have them in a box. If anyone wants this pile here let me know- I’ll send it to you for free (you pay shipping).

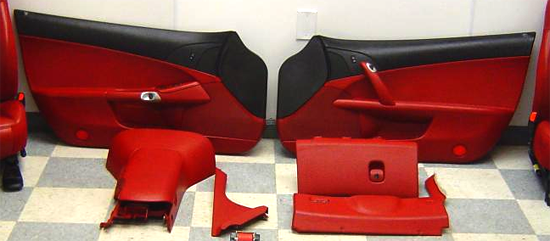
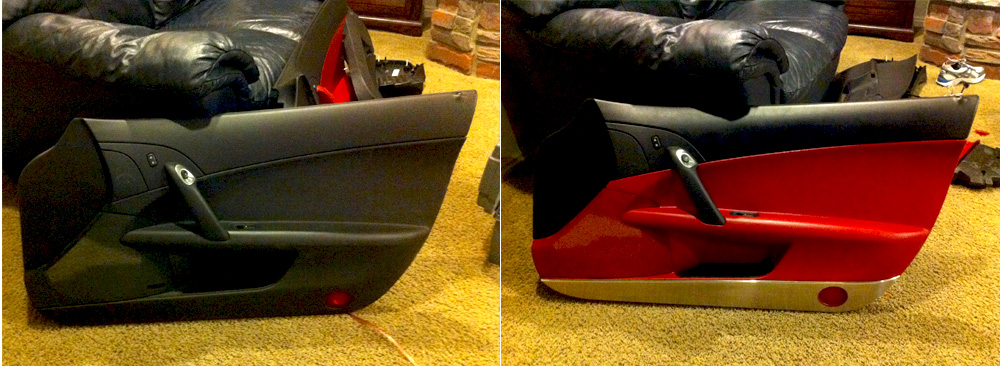
I started with a black ebony door and I worked in red cobalt pieces from the new model. I changed it a little from the Ron Fellows model because I wanted additional black accents. I also added a brushed metal kick plate on the base of the door. Overall I really like how the doors turned out. And I’ll just take a sec here to apologize for these pictures- most all the photography I do on my blogs in with my iPhone. When it’s not an iPhone you’ll know ;).

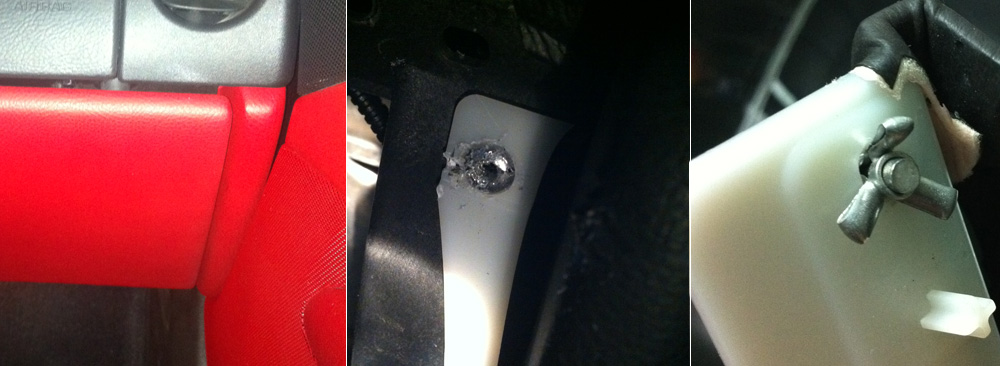
I pulled out all the under panel trim from the interior and replaced it with the new red parts. The only real issue I had was the tiny red piece you see in the picture below (piece in the center – and this was the same trim piece that was missing from the first lot of red trim that I passed up). I thought that the piece was being held in by rivets, but after drilling them out I realized that they must be something else. In the end I simply had to pry them out using brute force. I have no idea why they would have used these fasteners- total overkill. When I put in the new trim piece I simply used screws.

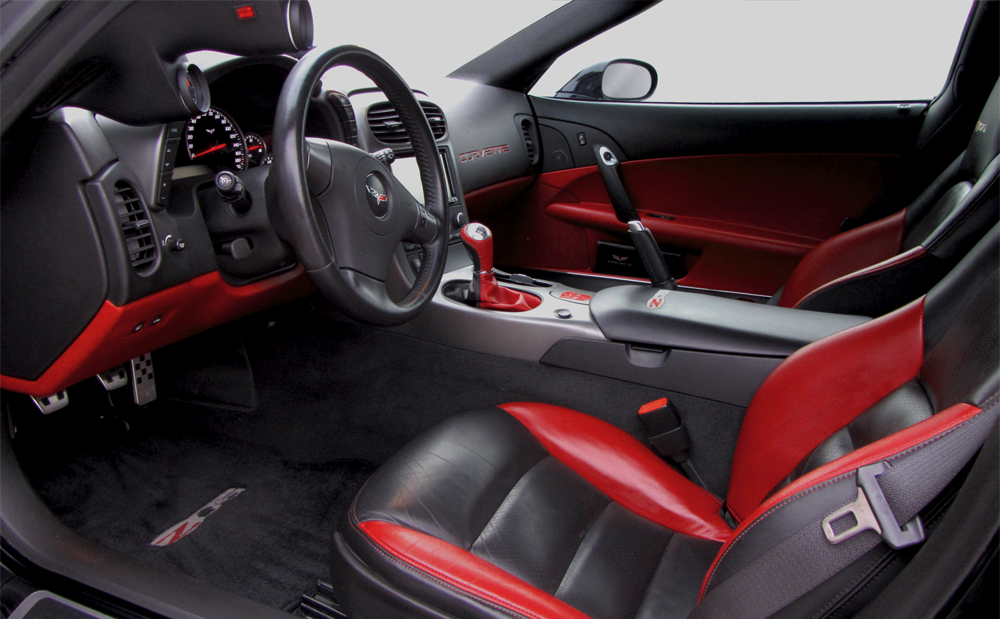
I have a red center console but I haven’t decided yet if I’ll put in in. At some point I have to take my receiver out to troubleshoot a ground loop so I might do it then. However, for the time being I’m pretty satisfied. This is the result so far (yes, this is my car):


Posted by Cam Hughes, Feb 17, 2012

Dyno Might

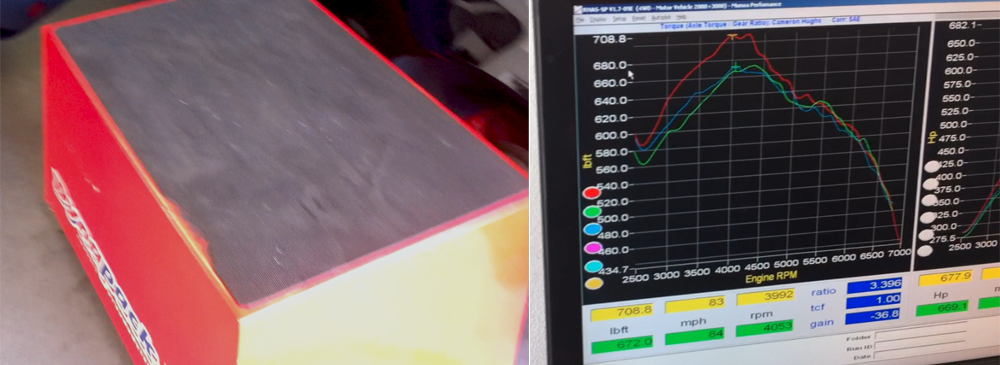
When you have extra power it’s fun to know just how much you have. You can guess, but until you put your car on a dyno all you have are hopes and dreams built on educated speculation. As of now I’ve had my car on two dynos and the results were pretty close.

Right after having the car tuned (and having methanol added) Marc put my car on Joe’s DynoJet. The first few runs they did without Methanol and the car kept slipping. But they finally got a good run with the methanol and it put down 693 WHP & 660 lbs of torque (although at that point it the car’s temperature was elevated- typically later runs have reduced power).

Earlier today I went to Adam’s work to use his DynaPack (the car bolts right onto the dyno, as opposed to sitting on a roller- the different types of dynos are pretty cool). The first run was the best (since the car was still cool) and the car put down 682 WHP & 708 lbs of torque. Supposedly the readings on a DynaPack are more accurate, but as I mentioned both of these runs were really pretty close.

These runs were both done around the same time of year and both on pump gas (91 octane). There are a few differences between the setup when the car was on the DynoJet and this more recent DynaPack run but I think they are pretty negligible (a few tune tweaks, different clutch, etc). Overall, not too shabby (close to 800hp at the crank and a butt load of torque). It’s actually about what I’d get out of Lingenfelter’s $50,000 upgrade kit (although I’m sure my set up is far less bullet proof).

I can’t help but lust after 1000 WHP though. I think I might actually take the plunge this year. The warranty is up on my 2007 so I feel like I should either trade it or modify the hell out of it (or into it). Not sure what I’ll do yet. But for now I suppose I’ll have to be happy with my 680 beautiful rear wheel horses.


Posted by Cam, January 2, 2012

Winter Thunderland

This winter has been so mild over here it’s a little unsettling. Still, it’s fun to have some extra driving time.

But nothing ever comes easy or without consequence…

Last week I decided to run some errands in the Vette. I hopped in, hit the ignition button and heard the dreaded clicking. This was super annoying because I’d just charged the battery a week earlier (the drain was way too quick). I tried to jump the car- twice. No luck. Time for a new battery (after only a year and half?). Getting the right battery for the Z06 (locally) isn’t simple. In fact I’ve been using an AutoZone battery that was almost a match. This time I switched over to an O’Riley battery that was a closer match to the factory battery (one day I might break down and get the right one…). Anyway, the switch went pretty painlessly and I was back in action pretty quick. I couldn’t believe how much better the car ran with a properly working battery. Come to think of it, the more I drive my car the better it seems to run (I know, “duh”).

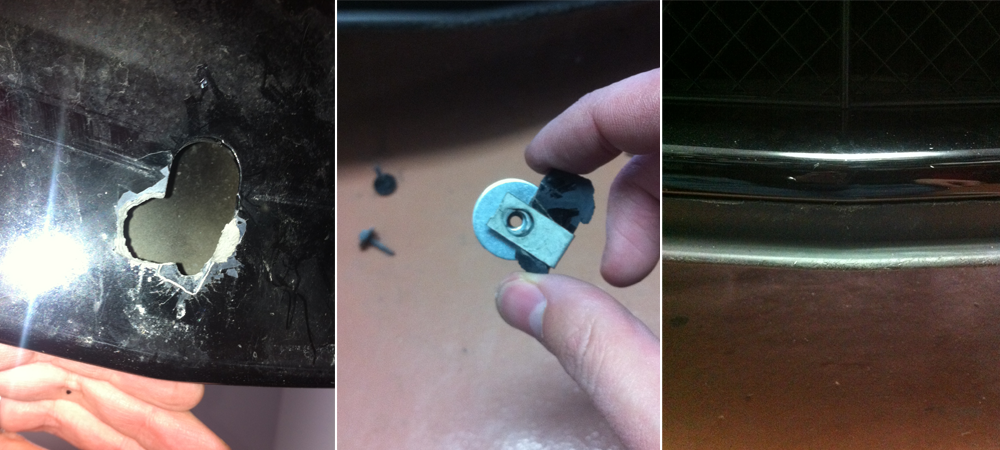
And sometimes I think the universe is out to  get my Corvette.  Lately I’ve been doing some body repairs that I don’t think I should be dealing with. I was cleaning rocks out of my body panels (a consequence of Utah roads, I guess) and I noticed that part of fiberglass body underneath the car was cracked (around a bolt). After careful consideration I have two theories: 1) Someone (not me!) tried to jack the car up in the wrong location and broke part of the body. I don’t know who would have done this or when it could have occurred (especially since I do most of my own work). 2) The time I rolled over the exhaust tip and heard what sounded like an explosion may have caused this damage (I looked around under the car right after it happened but didn’t notice anything). Anyway-  I had to remove the cracked portion of the body and I used a large metal washer in it’s place. It’s effective and no one will ever see it… but geez! That probably added an ounce or two of weight!

And then the other day I noticed that my chin splitter (under spoiler) was hanging off the car a bit. I jacked it up and discovered that the bolt that holds the tip of the spolier on had been ripped out from the body (literally took a piece of the body out with the clip).  I’ve bumped the nose of my car before and I know when I do it. Ripping this bolt out would have take force that I think I would have noticed. Again, a washer to the rescue (I use them to fix everything, but it’ another ounce). I remounted the spolier and it’s nice and secure. Although it’s pretty scuffed up- probably the result of the car being lowered.  And while I was under the car I also noticed that I was missing about four hex screws (the ones in the background of the center image below) in various locations. No idea where they went, but I put in replacements (you can get them at any Lowe’s) and felt much better.

Speaking of stuff I need to get in the coming months- I need a  transmission overhaul. The synchros in my transmission are having some issues. I’m a little surprised I’m having this problem given the infrequency of abuse my car sees (and the fact that it only has about 15,000 miles on it). Once the trans warms up there are really no driveability issues at all, but when it’s cold it can be sticky and occasionally grinds when shifting. I have some fun money so it’s very possible that I might simply pull the trans and put in something a bit tougher. No idea what kind yet, but it needs to handle the power of my new  built 427 engine (one day 😉 !).

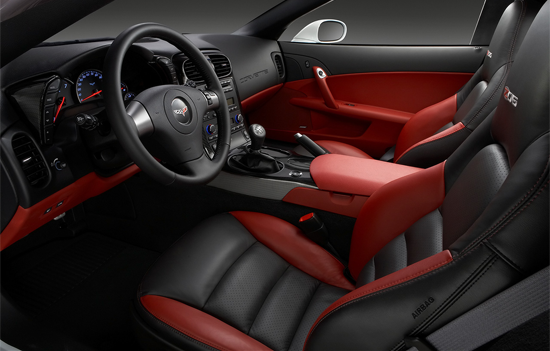
I’ve got some other fun winter projects coming up though . I have some incoming interior trim in red because I want my car to look like the pic below (although I’ll have my red shifter- after all that trouble I can’t give it up).

Anyway, now that work has let up a bit I hope I’ll have more time to blog.  In addition to the pain and suffering I suppose there is also a ton of fun car stuff going on this winter. Pain and pleasure thy name is Corvette.


Posted by Cam, January 1, 2012

My Little Corvette Buddy

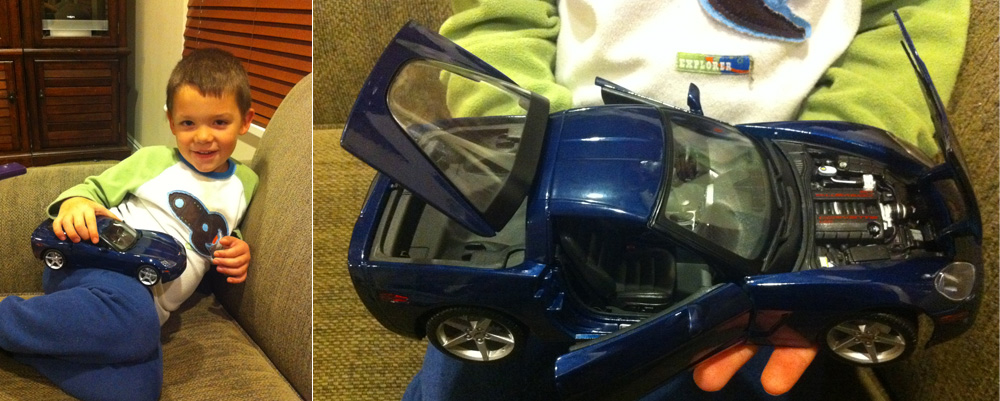
My youngest son recently came into a bit of money ($13).  While shopping at Costco with his mom he came across a display of different cars. My wife said that without any hesitation he picked out this blue Corvette and said that’s what he wanted to spend his money on. He played with the car non-stop for two days and even took it to bed with him (this is what the boys in our family do- when we like something we take it to bed).  He kept saying the cutest things like “We have Corvettes, right Dad?” and “Our Corvettes go fast!” I think this little guy is going to be my car buddy when he gets a bit older.

The car models from Costco are each $12 and for the price they are actually pretty awesome The Corvette my son bought has an incredibly detailed interior and engine bay. I’m almost tempted to get one myself! Anyway, just wanted to share this little moment of joy.


Posted by Cam, November 12, 2011

A Bright Idea (How to Change Your Accent LED)

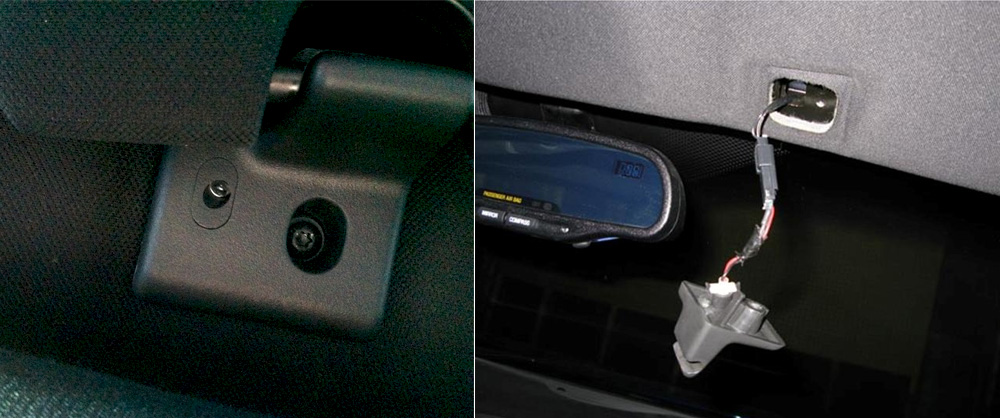
I saw this mod mentioned on CorvetteForum.com and it looked like a fun project. I actually had no idea there was an accent LED!  The light is located on the clip that holds in the passenger sun visor (it’s a super dim orange bulb). Taking off the visor clip is cake. Just use a Torx 15 on the screw and carefully pull out the harness.

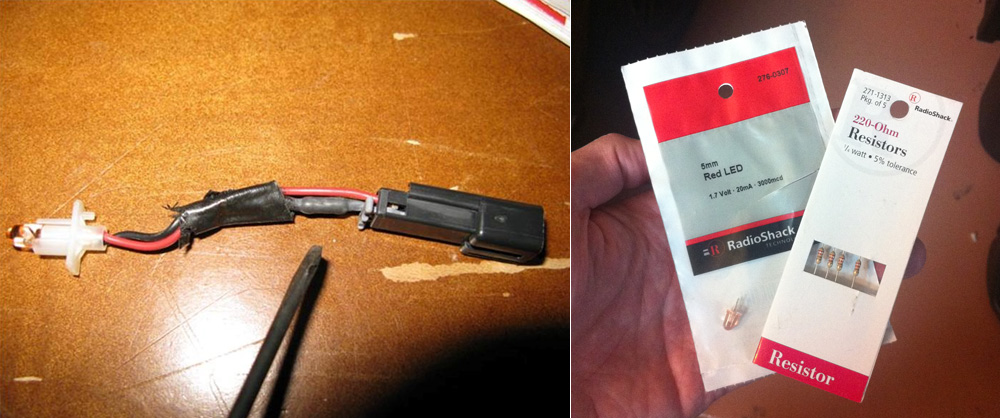
Now the fun part: Pick out your new accent LED. You’ll need a 5mm sized LED. You can find these at Radio Shack or online from websites like SuperBrightLEDs.com. LED color choices are plentiful and the accent light can be as dim or as bright a you want. Light output is measured in mcd’s (millacandelas). The more mcd’s your LED has the brighter it will be. For reference I used a red 3000mcd LED from Radio Shack. The bulb simply pops right of the plastic harness. Just cut the contacts on your new LED and pop it right in.

The voltage going into the accent LED (from the car) is about 7.6 volts. Depending on what LED you pick you may need to replace the resistor. You can find online calculators (such as www.led.linear1.org/1led.wiz) to help you figure out which resistor to buy. If you decide to use a new resistor simply snip out the old one and solder the new one in its place. I used a 220 Ohm resistor with my LED. One you make the mods just put your LED harness back in and try it out. If it’s too dim or too bright you can try different bulbs until you find just what you’re looking for.

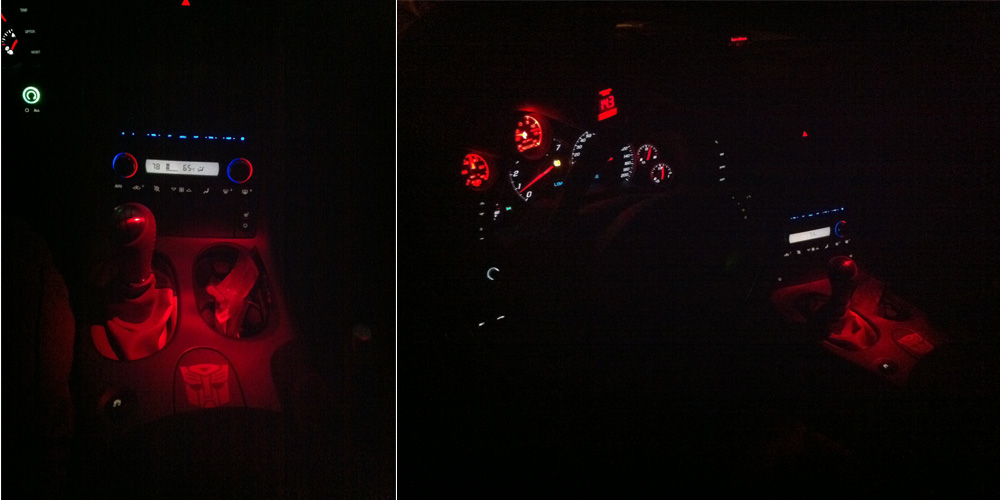
And here is the finished result. My goal was to produce a good amount of red light to illuminate my center console. Overall I’m really pleased. I just put in some Autometer ES series gauges and this is a great way to balance the the red interior lightning. Even though the light is fairly bright it’s not distracting at all. Other people have done blue but I haven’t seen any other pics of red yet. This is the cheapest ($3), fastest (10 min) and proportionally satisfying (9/10) mod yet!

This might be my last post for a bit- we just had a beautiful baby girl and the holidays are coming (I’m in retail and this means way more work). Time will probably be in short supply for the next few months.


Posted by Cam, October 20, 2011

This project was originally suggested by DSteck over at CorvetteForums.com. He posted a great tutorial about how to swap your C6 Corvette accent LED. I used a couple of his pictures here in my blog post (with his permission). The source post has some interesting info that’s not included here so it’s worth a look.

Autometer ES Gauges (How to Install C6 Corvette Gauges)

Once you start down the road of car customization there is no end. There’s always one more accessory, another change, and a quick tweak that turns into a major project. “I’m going to replace my gauge pod… and my gauges… and I guess my whole A-pillar trim and hell, I may as well pull the steeling column panels out and rewire everything since it wasn’t quite right before.” So that’s what I did.

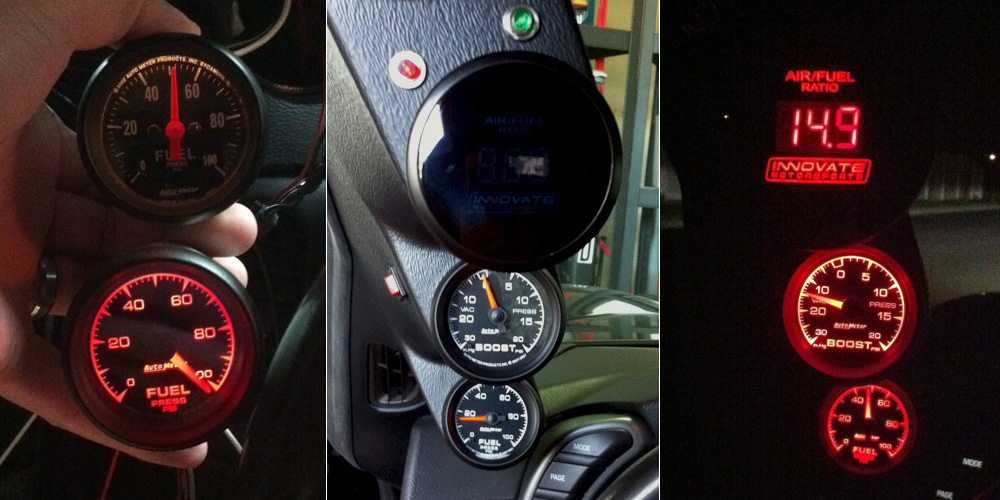
I decided I was sick of the incandescent edge lit Autometer Z-series gauges in my car (and even more sick of the fact that they are wired in such a way that they are always lit).  I really liked the look of the red LED backlit Autometer ES series gauges and so I picked up the fuel pressure and boost models. I think the lettering font on the ES gauges looks much better too and I like the fact that the letters are white when they aren’t lit. The ES gauges also go really well with my Innovate AF gauge.

A Few Installation Notes

My gauge pod was in bad shape from being pulled off several times (warping,  misaligned panel fasteners, extra holes) so I decided to get a new one.  I recommend Speedhut for gauge pods for the C6 Corvettes (both 2 and 3 gauge). They pods are inexpensive, good quality and Speedhut offered fast free shipping. No issues. The extra lights and switch on my pod are for the methanol kit, btw.

If you’re putting in your gauges from scratch then there’s a great document from A&A Corvette Performance: C6 boost and fuel gauge installation  on the A-pillar (as a side note: I got my last clutch from A&A Corvette and they were great). I didn’t have to run the wiring for the fuel pressure or boost gauges this time (I used the old wiring harness & tubing), but I did end up taking off the paneling below the steering wheel to tweak the wiring and I have a few things to add to the A&A instructions.

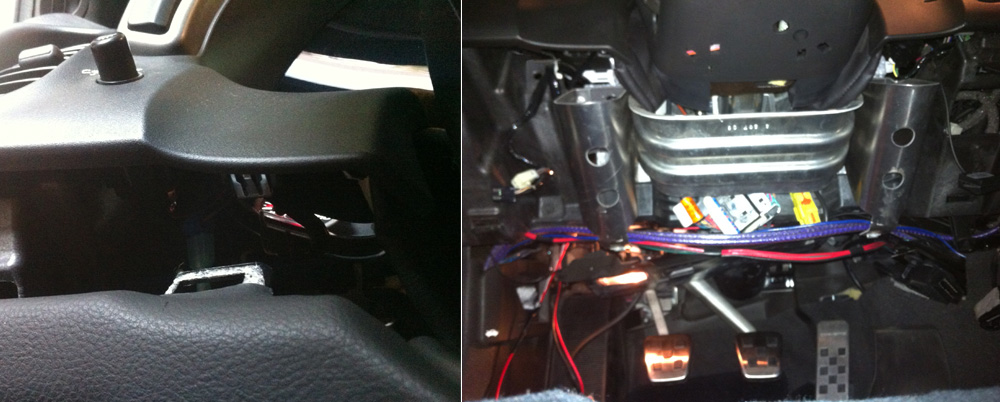
When you pull off the paneling it’s important to note that the bottom panel (below the steeling wheel) actually has a bracket that the dash panel clips into. You need to pull the dash panel out a bit to remove the lower one (left picture). Then just for reference this is what you should see minus the red & purple wires on mine (right picture).

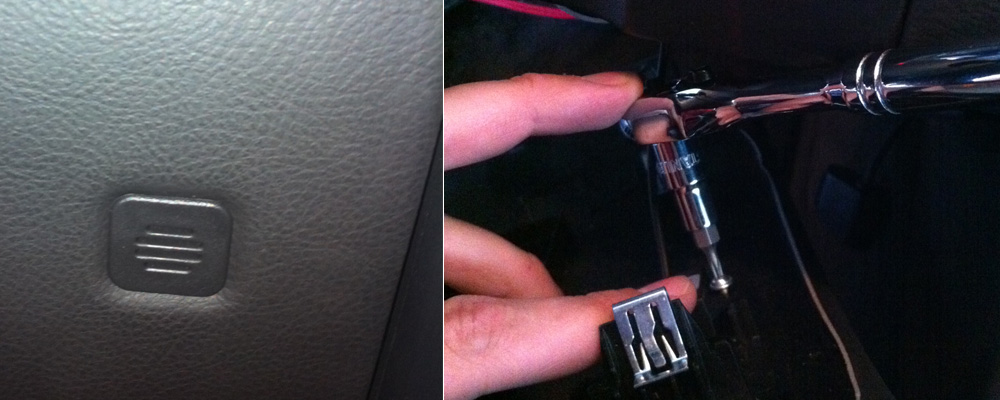
I don’t see a need to remove the ignition button as mentioned in the A&A doc. But you will need to remove the small microphone (left picture).  There’s no harness for this part and the best way I could think to remove it was to use a Torx 10, a socket wrench and and hex head adapter. This will give you the angle you need to unscrews the microphone (you could just prop the panel up on something and not actually take it off but it is more convenient if you remove it).

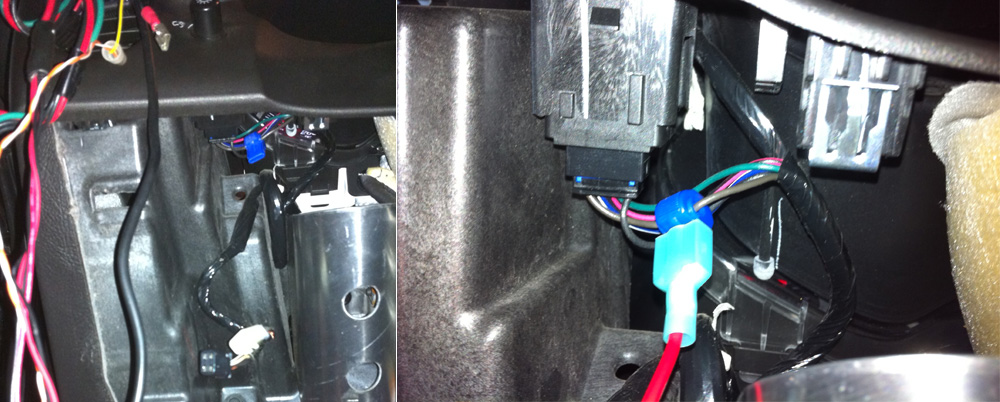
The dimmer harness is easily accessible from under the dash (it’s right behind the dimmer switch). I don’t think it’s even necessary to pull the harness out. I spliced into the wire and used a T crimp clamp to run power to my gauges (just the power for the backlighting). It is really nice to have the lightning in the gauges functioning with the headlights in the car (I also wired in my wideband gauge to that it dims at night).

Like I said, I didn’t do any of the hard stuff this time around, but I wanted to add a couple of suggestions and pictures from the work that I did do. So there you have it- my pod and gauge swap. And it’s just like the saying goes, “Gauges make the man.” Or something like that.


Posted by Cam Hughes, October 17, 2011

Sticker & Emblem Insanity Post Update