Battery Blues

I miss the good old days when cars were simple. If your battery was dead then you car didn’t start. That was it. But now… oh man.
Dead Battery

The weather was actually pretty good a couple of days ago. A lot of the snow had melted and the roads, for the most part, were dry and free of debris. I thought I’d take my car for a quick spin so I headed over to work to pick it up.  I recently got the Tron soundtrack and thought it would be fun to listen to it on my car stereo. It probably would have been…

My first clue that there was going to be a problem was when the door didn’t want to open. I waved my key at the car and said a few encouraging things and the door finally unlocked. The interior lights seemed fine so I pushed the ignition switch. The car began to have convulsions. It made several loud clicks (the starter unsuccessfully trying to turn the engine over), the stereo blared to life accented by crackling, the interior lights began to dance, both windows rolled down about an inch and the left headlight started to flicker. I turned the car off. But you know cars these days. When you turn them off they don’t actually go off. The left headlight kept sputtering and the lights on the dash flickered uncontrollably.

I might have been able to do something about, but that that moment a voice said, “Sir, can you please step outside?” I hopped out of my car, and shut the door, hoping that would let the car know we were done. I turned around and was greeted a police officer. “What are you doing?” he asked.  I suppose I looked a little suspicious…standing there with the bay door open… apparently hot wiring a corvette… .at 1:00am.  I managed to soothe the policeman and returned to the task at hand.

The door was giving me trouble again. Back to square one. I went to pull  my key out  to show the car that everything was okay. No keys. I looked around for a bit and then it hit me. I pressed my face against the car’s window. Beneath the dim interior light I cold see the key nestled safely in the cup holder. Deja Vu.

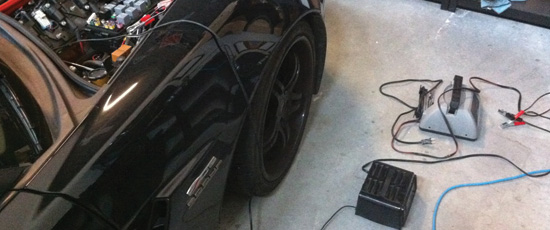
I tried to stay calm. I explained the problem to the car and tried to the door again. To my disbelief it opened. I grabbed the key, popped the hood and got to work. The car clearly needed a charge. After I got things hooked up I wandered around work for a few minutes trying to decide if I’d go home or wait for the car to charge (Tron’s music was still beckoning and, after my ordeal, I would have enjoyed a drive). That’s when I noticed a charger that Jim had brought to work for his car (which, ironically, was also sitting dead in our shop).  “This has a jump start feature!” I noticed excitedly.

I switched the battery chargers out and set Jim’s charger to the jump mode. I gave a the car a few minutes and then climbed back inside to try again. No blinking dashboard lights- good.  I pushed the ignition button again. The car briefly turned over and then reverted back to clicking mode. The lights flickered and then the left headlight went out completely. I turned the car off and the right headlight began to strobe and the left window dropped halfway down. My radar detector turned on and the “low voltage” warning light blinked at me. Nice.

That was enough of that. I put my old charger back on, set it to trickle charge and went home. The next morning I went back to see how things had gone. I unhooked the charger. No problem getting into the car. I fired it up. It turned over perfectly and everything seemed in order. I revved the car a few times. Awesome. All the stereo presets were even intact. I’d brought her back from the edge of life!

And I would have gone for a drive that night except mother nature decided I was clearly in need of a break from my car. It snowed about three inches in the late evening. And that’s my story. I guess you could say I got the battery blues. Yeah I got the “my car won’t start, ’cause the battery is dead” blues.


Posted by Cam Hughes, January 9th, 2010

Cold Wheels

Well, it’s winter again. I park the car and get depressed. It hasn’t snowed too much, but this time of year the ground is peppered with gravel and debris. The cold doesn’t help either (it affects traction). There are little breaks in the weather here and there and I take my car out, but a once a month drive just doesn’t do it. A Vette is kind of a silly thing to own sometimes.

Ideally winter would be a good time to get some projects done. Sadly, I’m in the retail industry and there isn’t much free time during the winter. All I really have to do at the moment though is replace my wideband sensor (they go bad occasionally). Right now it defaults into error status after a few minutes of driving. I might just unplug it since I don’t really need it now since the car it tuned. But I wish it was working…  Yeah, my wideband will be my winter project.

And that’s a wrap for the year. I’ll see you guys in the spring!


Posted by Cam Hughes,  December 10th, 2010

Sticker & Emblem Insanity

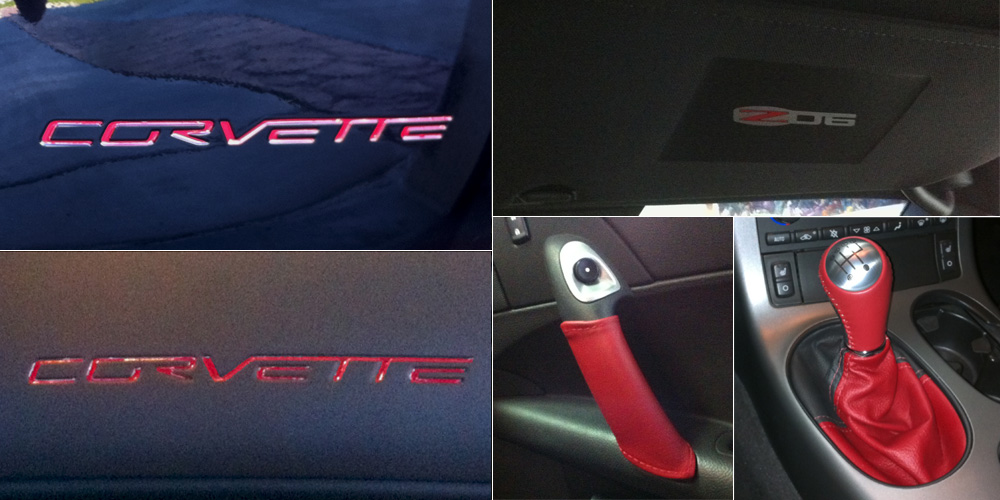
UPDATE (October 16, 2011): Yes, I’m still hard at work adding stickers to my car! I recently found a company who manufacturers stickers that fit in the “CORVETTE” indentations on the rear bumper and  passenger dash. I picked Victory Red for the exterior and Cobalt Red for the interior.  The same company also offers black vinyl stickers to cover the white and yellow air bag warnings on the sun visors. Done and done!

In addition to stickers I’ve been adding some  accents in the car. I recently installed a tone shift knob and some leather door wraps (both Cobalt Red) that match the seat. I also put in new Autometer ES series gauges (backlit red) and I’m considering replacing my gauge cluster with a red model. To me form is as important as function.


To begin with, I apologize for the pictures. First, because no one really wants to see them. And second because I took them on my iPhone. Cameras on phones have come a long way, but it’s still hard to take pictures in low light (a lot of graininess and motion blur), close ups, and anywhere you might need a half way decent flash. But you can’t beat a camera phone for convenience. But I digress. I now present to you my… quirk.

Plastered across my rear windshield is a “Benchmade” banner.  My company, BladeHQ, sells Benchmade Knives and, being a loyal fan and purveyor, I proudly advertise Benchmade on the back of my car. I also have a Microtech sticker (Microtech Knives are also very cool) but I’m not sure if there’s room for it right now.

On the front left of the windshield I’ve got an ACT sticker (I just put in a new ACT clutch) . The red and silver won me over. I’m a sucker for a fun sticker.

On the front right of the windshield I’ve got an HP Tuners sticker (this is the program I use to tune my car). I thought the white added some nice contrast.

On both sides of the car, below the Z06 badge, I added custom “800 HP” emblems (from West Coast Corvette). I unabashedly promote the current crank horsepower of the car in the same way the stock C6  Z06 badge does (in tiny red letter it says, “505 HP”… but it’s not anymore!). I get a lot of flak for this, but I can take it.

Inside the engine (on top of the intercooler) I’ve got a little plaque that that has the engine specs for the LS7 (left side) and then an “LS7” emblem (right side). They add a nice little splash of color to the engine bay (can you tell I like red, black and silver?).

And of course I’ve got my car peppered with various red Autobot decals. Yeah, maybe I need some help. I try not to make things tacky (believe me, everything looks much better in real life), but it’s possible that I do go overboard sometimes. To my credit I haven’t added a “twin turbo” emblem…. yet. But then again,  I am guilty of putting a Hannah Montana sticker on the drill press at work and insisting that everyone refer to it as “Miley.”

Anyway, I hope this handy guide will help you to recognize my car. It may be hard to see anything though, since I’ll be blowing past you at light speed. Ooooh!


Posted November 09, 2010

Shift Knob & Garage

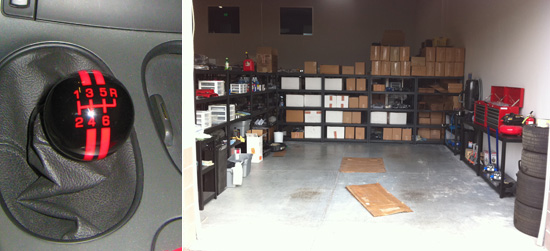
I like to get little accessories for my car. Maybe it’s the same way that moms seem to enjoy dressing up their little girls. But guys can’t dress up their little boys- it would be weird (yes, I just compared my car to a child). Anyway, I got a new shift knob for my car. Red & black. I think I like it. Aesthetics aside, the real advantage is that it sits an inch lower than the old one. That makes the throw shorter and, in theory, could improve my shifting.

Also, here’s a quick peek at my garage at work. My wife kicked me out of our garage here at the house (spurred by the “falling exhaust” and “tulip bulb” incidents). When we moved the business to it’s new location I commandeered  a little corner of the warehouse for myself. It’s nice to have the space and it’s big enough that I can do projects (stereo install, oil changes, switch tires, wash/wax, etc).  Sometimes wish I could park the car at home; it can be  hard to get over to work to get the car. But hey, soon enough we’ll need the space at work for “work” and I’ll get to move back home. Hopefully that time frame coincides with whatever development needs to occur in my children’s brains to create some common sense.

Next up, my strange obsession with stickers and little emblems. For some reason ever since I was a kid I’ve compulsively put stickers on things. Maybe it’s some kind of territory marking ritual. Maybe I just like them. Can’t really say. I hope it’s nothing serious (did I mention I even want to put stickers on my wife?).


Posted November 07, 2010

You Win Some, You Lose Some…

I did manage to get the clutch installed before the last race at Rocky Mountain Raceway (RMR). More on that in a bit. First, I’ll do a quick review of the clutch. As I mentioned the clutch I went with was the ACT T1S-G01 (BTW- I ordered it from AA Corvette and I can easily recommend them as a great source for parts).

After getting the clutch installed (another BTW- clutch installs on the Z06 models are a PITA!) I only had  a couple of days to break it in before th race so I drove the car a lot. I’d been warned to expect harsh engagement and a lot of noise from the clutch, owning to the fact that it’s a twin disc model. I found the engagement to be very smooth. In fact I can put the car in  gear and just slowly life my foot off the clutch and it and it rolls forward without so much as a shudder. No problem on that end.

Noise-wise there is a lot of chatter in lower gears (when the RPM range is sub 2K). Occasionally when the clutch is disengaged it will even sound like popcorn popping (I’ve got not better way to describe it). The sound goes away when the clutch pedal is depressed. My understanding is that this is normal. In any event, I can live with the noise so it’s not an issue (my stock clutch had almost as much chatter)

Performance-wise the T1S-G01 is a rock. The clutch grabs perfectly and my street tires spin out in 1st, 2nd and sometimes 3rd . In fact, I had no idea just how often my previous clutch was slipping until now. The stock Z06 clutch weighs in at 55 pounds (I popped in on a scale when we got it out). The T1S-G01 weighs in at only 39 lbs. That’s a difference of 16lbs of rotating mass! It took the car a couple of weeks to adjust (it was surging at stops pretty bad from the change).  The new clutch is rated up to 85o lbs of torque so it should last me awhile (I’m only sending about 670lbs to it so there’s still  room for a few upgrades). Overall I really like ACT T1S-G01 and would recommend it to anyone wondering who’s considering it.

And at the same time I decided to upgrade the sway bars in my car. I went with the PDAFT Z06 Light Rate Racing Sway Bars and so far I really like them.


The stock sway bars hit the turbo piping in the front of my car. The PFADT bars are adjustable and so we were able to make them fit better.  They still hit a little (when going over larger bumps) but it’s much better than before. Additionally the car’s handling is improved  it sticks to the road even better than before. Another upgrade that I’m very happy with.

But you can’t win them all. It was sway bars or slicks. Since it was the last race off the year at RMR I decided to skip the slicks and do the sway bars. (there were still months of driving left). The clutch wasn’t quite broken in, but I decided to go for it. I actually ended up near the front for my first run so the track was really fresh. I wasn’t completely comfortable with the clutch, but I was not prepared for the spinning. I launched and spun… and spun… and spun. I ended up running a 13.8 at about 117 mph. Ouch. I got a second run too which wasn’t much better. Next year I’ll be ready though. Slicks and some practice and I’ll bet I can hit the 11’s. Fingers crossed (again).


Posted November 06, 2010

Race / Clutch

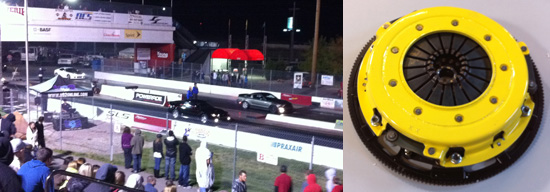
I went to Rocky Mountain Raceway last Friday to watch some friends race in the midnight drags. I’m hoping I can go next week, but I have a problem. My old clutch was slipping so I ordered this beautiful yellow thing (ACT T1S-G01 twin disk clutch rated to 850 lbs of torque! Plus it’s lighter that the stock assembly) but I have to get it installed and broken in by next Friday. The clock is ticking…


Originally Posted September 12, 2010

The Sound of Music

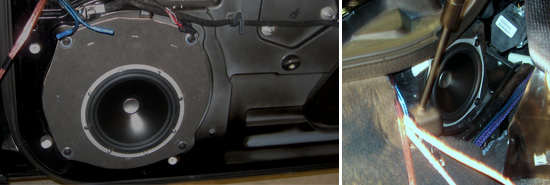
I’m sure everyone is sick of hearing about my car projects. So here’s another one! In past posts I have mentioned various stereo upgrade projects (head unit, amps, sub). But the stereo wasn’t complete…until now. I finally replaced my stock speakers (mids & tweeters). Overall, I am extremely happy with the cumulative results.

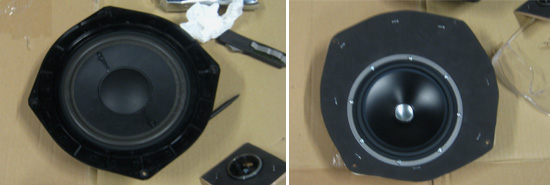
I picked JL Audio ZR-series component speakers (ZR-650CSI for the front and ZR-525CSI for the back) based on reviews I’d read and because I have liked my JL Audio sub so much (the ZR series speakers produce very clear and accurate sounds). The original speakers in the C6 are these monstrous 10″ paper things. Nasty. I had to make adapters to fit the JL Audio 6.5″ set. I used 1/4″ oak ply covered with foam. Same thing for the tweeters.

The speaker install was pretty painless. The hardest thing would have been running new speaker wire but Sound Warehouse had done that last year. Getting body panels off can be tricky, but the C6 Vettes are pretty straight forward.

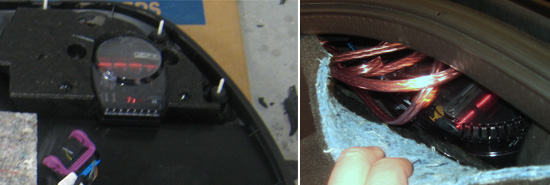
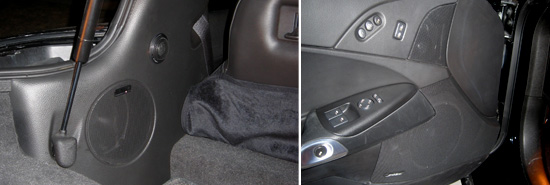
I decided to put the front crossovers in the doors. Instructions will tell you never to  put them inside the door, but there’s a right way to do it.  I mounted them in the side impact foam- they are perfectly safe from water and dirt.  I mounted the rear crossovers behind a carpeted body panel in the trunk section- safe and accessible

With the panels back on everything looks great. I mounted a component set in the back as well. Jim helped me tweak the setting on the amps and crossovers. We pumped out some Enya and tingled. When your stereo makes you tingle you have a winner.

Below is the total rundown of my project. The labor time listed includes fabricating parts, carpeting, installation & testing/tuning. I’m not going to discuss price, but you’ve got everything you need if you really want to know. The bottom line is that I’m thrilled and I feel like it was worth the time and money I put into it. The stereo is finished. Now it’s time for the engine. Maybe. Probably. Yes, definitely. Getting close…

Pioneer Avic Z1 head unit with the Sirus/XM radio, blue tooth and iPod modules (install by Sound Warehouse).

JL Audio ZR component speakers: 650CSI in front and 52sCSI in back  (custom front speaker plates & install by me, 12 hours).

Kenwood XR-4s amp  for the mids & tweeters and Kenwood XR-1S amp for the sub woofer (custom amp rack by Justin & me and install by me, 8 hours).

JL Audio W6 10″ sub (custom sub box by Justin & me and install by me, 7 hours).

PAC Steering wheel control interface (install by Jim & me, 1 hour)

Wiring for head unit (RCA cables from Lightning Audio), subs, and speakers by Sound Warehouse


Originally Posted March 21, 2010

Yet More Car Stuff

It’s true. You’ve heard right! I have done more stuff to my car. No one cares and I get that. But I care. It’s fun for me to post these little enhancements on my blog. And you never know- they might actually help someone who’s putting in the same stuff. If you decide to read this, fine. But I’ll just be upfront: this will probably be very boring and mildly technical. And naturally I’ll give you the “these pictures don’t do the mods justice” disclaimer. They are puzzle pieces of a much larger picture.  Once the puzzle is done I’ll wow you with some full body shots. Yeah, you can’t wait. I know.

Guess what I have on my steering wheel? Anyone? Stereo controls. It’s been bugging me for a year: steering wheel stereo controls that don’t control my stereo. But it’s okay now. I’ve remedied the situation with the PAC SWI-PS steering wheel control Pioneer stereo interface.

My Pioneer Avic Z-1 was ecstatic (”For me? Really? Oh wow. I don’t know what to say!”).  All I had to do was wire the PAC unit in and control away! After I got the car’s center console removed I had second thoughts (deja vu, right?).  After attending several years of trade school to become an electrician I began the project. First off,  I just want to say that I found the instructions for the PAC system unnecessarily confusing. They provide three different sheets of instructions (programming info, stereo harness diagrams, and car / PAC interface / version info). If you’re going to install this little guy just use the online instructions.

I got the PAC unit wired into the car’s original stereo harness just fine but I had a heckuva time finding a 12 volt power source that was tied to the ignition system. Jim to the rescue! Jim’s knowledge of electrical systems surprised me (and possibly him too) and he proved an exceptional ally as we waged war against the mess inside my car. We found a suitable 12 volt source and a ground and had the PAC interface working in nearly no time. The Z06 steering wheel has a  larger “1-6″ button that the PAC really doesn’t accommodate. I’d recommend mapping the “mute” function to it (a very handy function).

After all the excitement with my stereo I decided to take a break and tackle an easy problem.  When you work on a car sometimes you need the hood up (to pull a fuse, run a wire, charge the battery, etc). The Z06 hood has a small light that comes on when it’s open. The light never goes off.  I used to pull out the bulb, but then I had to put it back in. Out, in, out, in. What a nightmare.  I decided to put in a switch. Now when the hood is up and I don’t need the light I just switch it off. Best thing ever.

Well, except for black anodized custom painted aluminum engine caps…  I’m trying to get a black/red color scheme going for the engine. I bought these black aluminum caps and then painted the vehicle markings on them myself. They actually turned out really well.  Vanessa loves them. Remember, Vanessa is the car. Who’s crazy?

Anyway, it was finally time for a wideband. In a nutshell a wideband is a sensor that will tell you the air/fuel (A/F) ratio of the exhaust. With that information you can determine if your car has too much or not enough fuel. I bought HP Tuners awhile back and now I’ll be able to [more] safely use it.

The wideband installation was a job. I purchased an Innovate Motorsports LC-1 kit (which so far I would recommend). It comes with a gauge to display the A/F ratio. Cool! But that meant that I had to switch out my two gauge pillar (which has fuel and boost pressure gauges) with a three gauge pillar. No sweat, right? Advice: When switching out gauge pillars don’t try to make anchor pin holes in the same spot as the old gauge pillar. Just pull out the pillar trim, drill new holes, wire everything up, attach the gauge pillar back to the trim and put it back in.

Getting under my car is tricky so I took my her to Vince (of Lung Automotive). I had him weld in a sensor bung and then run the LC-1 control module. He poked the leads out through the shift boot which seems to work really well. Thanks Vince! And once again Jim came to the rescue and assisted me with the wiring portion of the project. Advice: The instruction manual for the LC-1 notes that there are two wires which have to be soldered together. It’s not kidding. Crimping won’t work. You have to solder them. Jim proved to be an adept soldering iron handler as well. It would have been difficult to achieve such exceptional result without his help. Thanks again Jim!

The gauge itself is pretty basic (I might upgrade to the XD-16 if the wideband proves to be useful). It’s a bit bright  and the constant flickering as the A/F changes seems like it’s going to get annoying. Maybe the gauge will need a switch like my hood light! I know a guy…

And finally I decided that I’d upgrade my pedals. In retrospect I don’t really know why. The clutch and brake portions of the upgrade are just cosmetic overlays, but the whole accelerator is new. Advice: Don’t try and unhook the wiring harness on the accelerator without being able to see what you’re doing. You should be able to get both of the bolts (13mm btw) out and remove the pedal with the harness still intact. Then you can pull the pedal out and see how to unhook things. It’s a super tricky harness (with good cause).

And finally, it was time to say good by to Mr. AcDelco. That’s my old battery. It served me poorly for the last year before finally giving up the ghost this past winter. It’s actually very difficult to find the correct battery replacement for a 2007 Corvette z06. In fact I couldn’t. I ended up getting a DuraLast with similar specs (same cold crank amps- very important). Justin helped me purchase and install the battery. The battery is located in a compartment in my trunk and I have my amp rack and speaker wires sitting on top of it. Advice: If you have you battery inside the car like I do and you end up getting a replacement that’s not quite the same as the original remember to make sure the new battery is vented.

Well that blog post was almost as much work as actually doing the car mods. Next up, I’m going to finish my stereo and then start working on my new engine (LSX block). 1000WHP ready or not, here I come.


Originally Posted March 21, 2010