How to Remove Your Corvette C6 Center Console

I have been meaning to make this post forever! When I was putting in my stereo I had to take out my center console about four times over the course of the installation. And then I had to take it out twice for the new clutch. During one of the removals I snapped some pictures. A  few of them turned out blurry so I’ll redo them next time remove the console (which might be this year- I have a few stereo tweaks that I want to do).

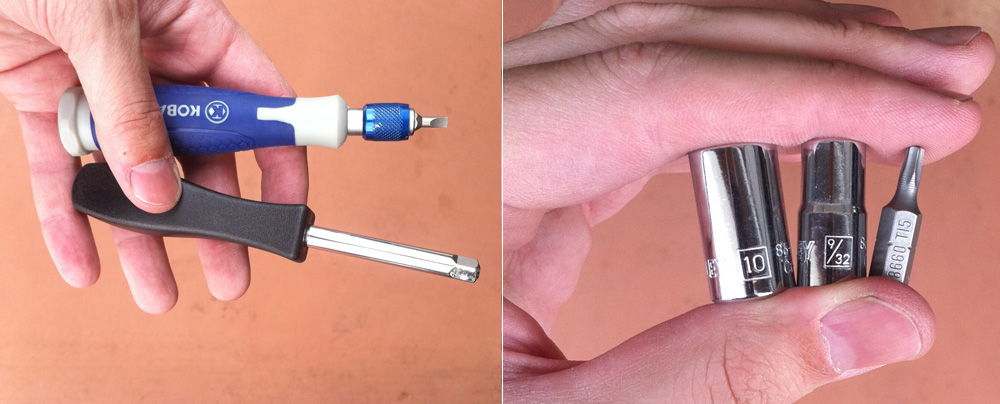
There are tons of reasons you may need to pull of your center console: Access to your stereo, climate controls, shifter, internal wiring, etc. If you want to try it yourself  just follow the instructions below (these are specifically for the C6 Z06 but should also work for coupes and convertibles). You’ll need a T15 Torx bit and driver as well as  9/32 & 10mm hex head socket bits andand  additional driver.  Also recommended is a small flat head screw driver. Be sure to keep all the small parts together (your bits, the removes screws, etc).

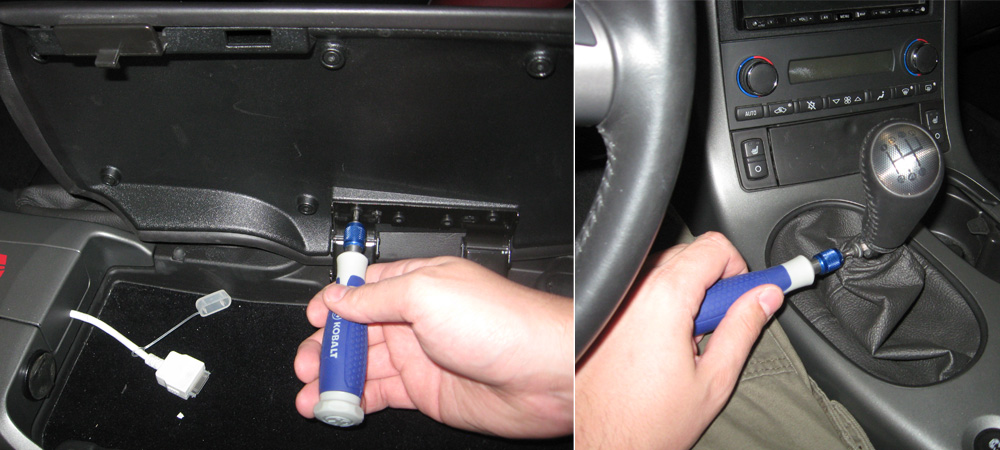
I recommend taking off the console cover. It makes it easier to get at some of the screws later and it’s nice to have it out of the way while you work. Unscrew the four Torx screws (Torx T-15) and set the cover aside. Next remove the shift knob (also Torx -15). If your shift knob is stock then just remove the Torx screw as show  and pull the knob off (f you have an automatic there’s nothing you need to do-  the console simply lifts off over the shifter)

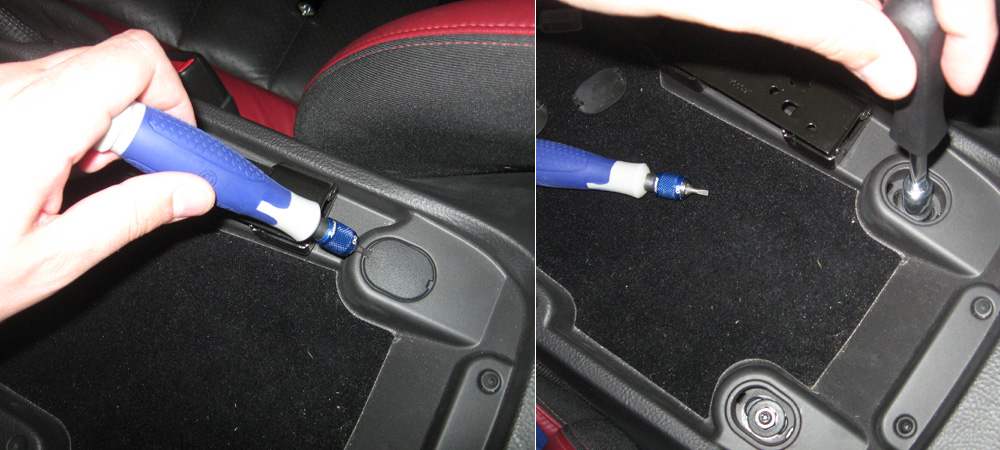
You will need to remove three hex nuts on the console. The first two are near the rear of the console.  Simply pop off the plastic covers with a flat head screwdriver and uncrew the nuts (10mm bit). [If you’re not pulling out the main part of the center console you do not have to do this step!]

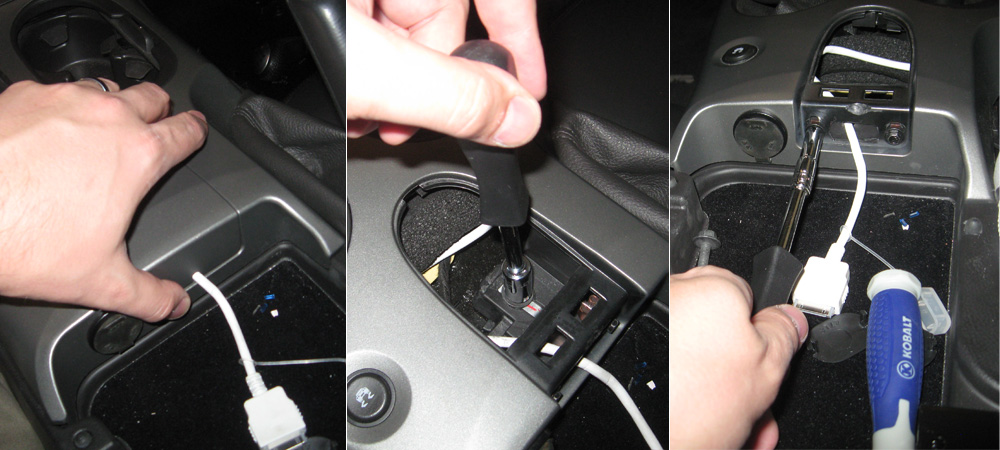
The third hex nut is under the middle potion of the console. Use your thumb to apply pressure on the plastic cover and pop it out (it’s held in by two clips). Remove the third nut as shown. Now you need to remove the two smaller hex screws (9/32 bit) as shown. The white cord you see is for my iPod- you probably won’t have anything hanging out here.

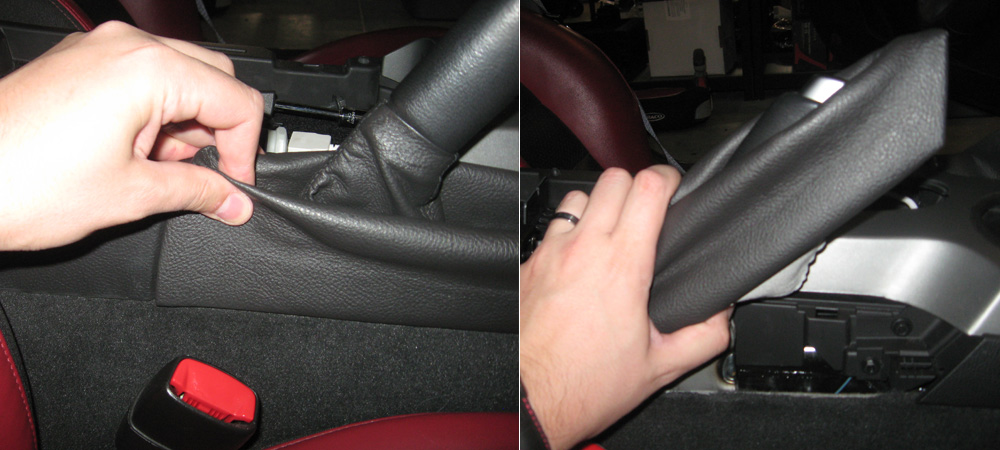
The next step is to carefully pull up the hand break boot. Grasp the boot carefully but firmly and pull it up.  The clips that hold it on will release with relative ease. Move the boot out of the way (it won’t come all the way off).

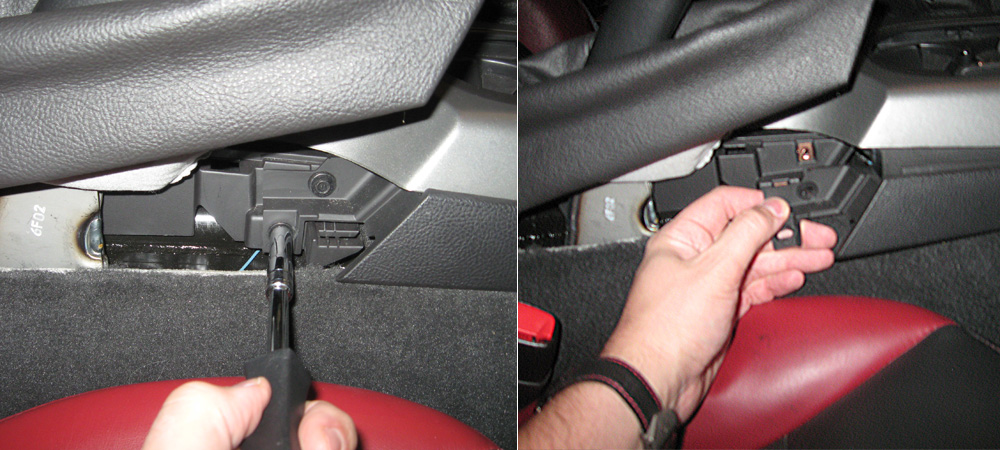
There are two more hex screws (9/32 bit). When these screws are gone you can start removing the piece of trim that runs along the bottom of the console.

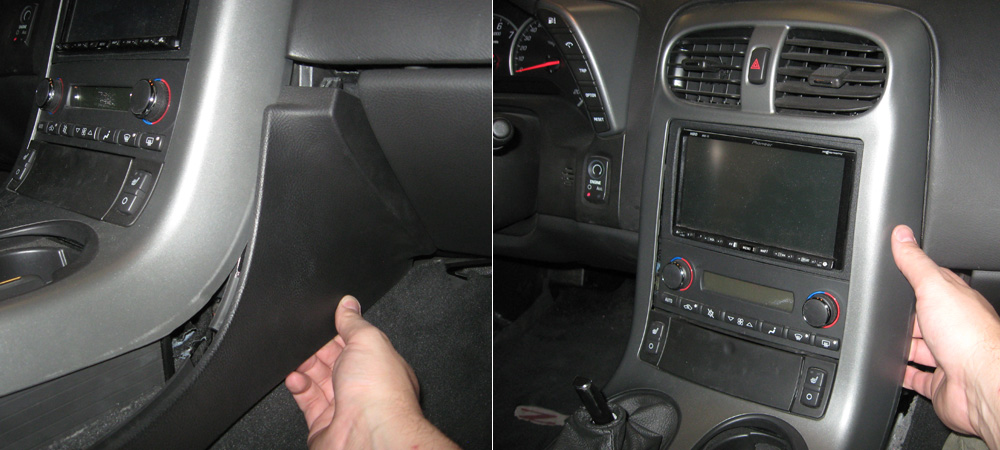
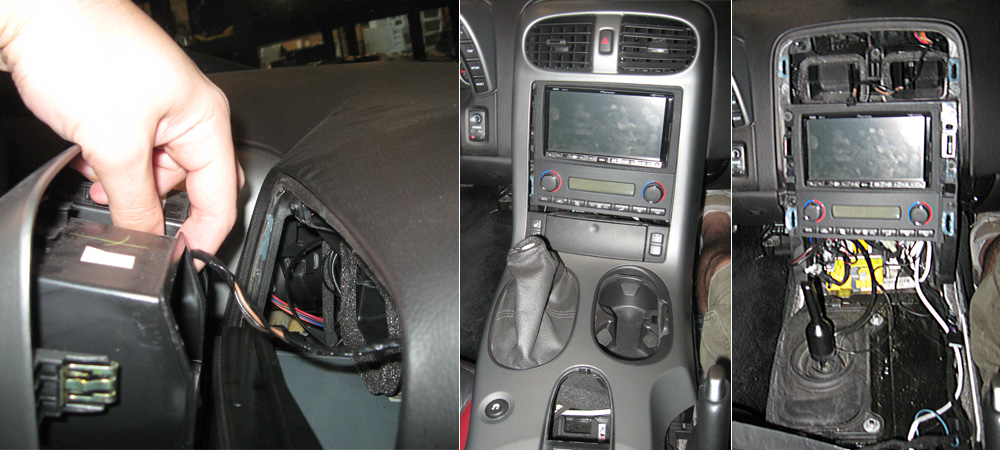
Carefully pull the trim out (you can rock this piece downward a little). Near the glovebox the trim is secured by two clips. You should be able to get a good view of them- they’re pretty sturdy so don’t worry too much about breaking them when you pop the peice out. With the trim removed,  slide your hand behind the main console and pull. This whole center piece simply pops out (again secured by clips). Try and work your hand around the console head and pry it out little by little (you don’t want to apply too much pressure to any one area or it could crack).

Once the head piece has been pulled out don’t try and lift it off yet! You now have to disconnect the the wiring harnesses. This can be fairly tricky and I confess that I don’t have pictures  that show the details of this process. Most of the harnesses have a tab that needs to be pushed down allowing the two halves of the harness to separate. There’s limited room to work but your flat head screw driver should come in handy here (and hey, when you get eveything apart take a moment to bask in your awesomeness).  In all there can be up to six harnesses that you need to unhook. 1) Hazard lights 2) Heated seats (two of them, if applicable) 3) Two cigarette lighters, 4) traction control button.

And that’s about it. Once everything is disconnected carefully lift off the whole console (it helps to have your shifter in neutral). And when you’re ready you can put it back on in the opposite order of the way you pulled it off. Remember to hook everything back up (it sucks to forget something). If anyone has any questions or needs clarification on a certain step please feel free to let me know and I’ll be happy to help. Again, next time I do this project I’ll try and replace the fuzzy pictures and even try and get some close-ups of the wiring harnesses. Best of luck!


Posted by Cam, September 5th, 2011

Corvette C6 Z06 – How to Change Your Oil

When it comes to my car I don’t like to take any chances. I do as much of the maintenance as I can myself. So, naturally, I change my own oil. This time I decided to put together a little “how to” guide. If you’re not comfortable working on cars then I suggest you take your vehicle to a competent service center. These instructions are only applicable to C6 model Corvettes (specifically the Z06). Any work you choose do to on your car is done at your own risk. So, let’s get started!

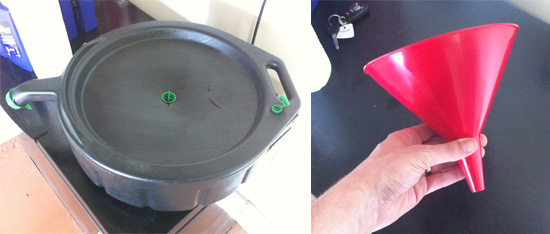
There are a few things you’re going to need. 1) An oil reservoir for used oil (at lest 10 quarts). You can get these pretty much anywhere that sells car care items for around $10. I’ll tell you what to do with your used oil later on. 2) A funnel. I recommend a 2 quart funnel for your oil. These are about $1.

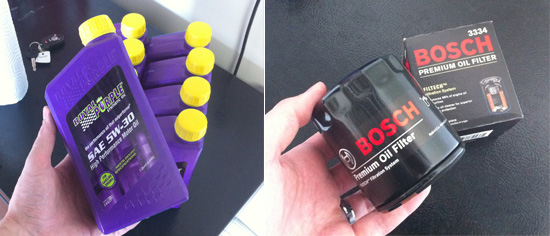
3) 8 quarts of 5W-30 oil (I use Royal Purple). I feel like I need full synthetic w/ my engine modifications but any oil that meets GM’s guidelines can be used. 8 quarts is for the Z06; If you have a coupe refer to your service manual. 4) New oil filter. I just switched to the Bosch 3334 this time so I could use a different kind of filter wrench (more on that in a sec). Anyone competent at a place like AutoZone can help you determine which oil filter you need if you pick a brand other than Bosch.

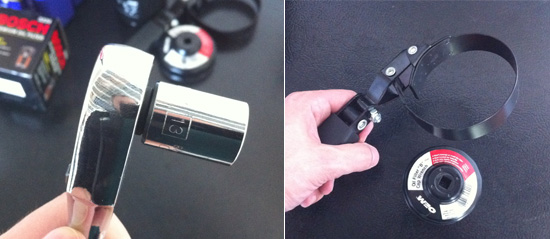
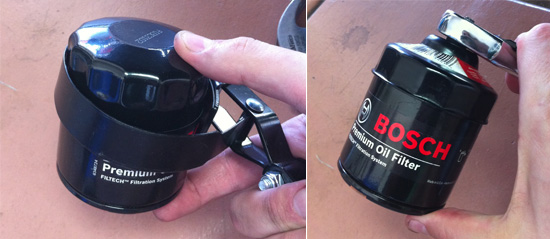
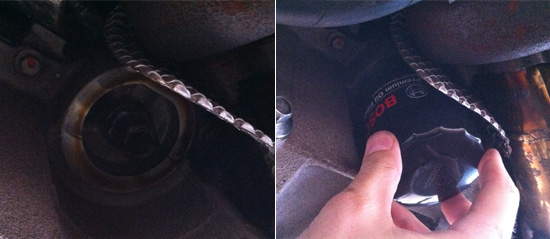
5) Socket wrench with 13mm head. This will be used to loosen the oil drain plugs. 6) Oil filter wrench. The band wrenches are good, but space around the oil filter can be limited (like on a C6) so I switched over the Bosch filter because I can use the attatchment below on a socket wrench and it’s much easier.

Here are two examples of how the wrenches fit over oil filters.:

7) Rags & paper towel. No matter how careful you are oil is going to spill onto something. 8 ) Here are some optional items you might want to have handy: mallet or hammer & 1 quart ZipLock bag.

So to recap here’s what you need for your oil change:
1) Oil reservoir (at least 10 quarts)
2) Funnel (2 quarts)
3) 8 quarts of 5W-30 oil
4) New oil filter
5) Socket wrench with 13mm head
6) Oil filter wrench
7) Rags
8 ) Mallet or hammer, ZipLock 1 quart bag (both optional)

Please note: This guide doesn’t cover how to lift up your car (see my “How to Lift Your Car” guide coming soon). But you will have to lift your car or have a pit to change the oil on the C6.

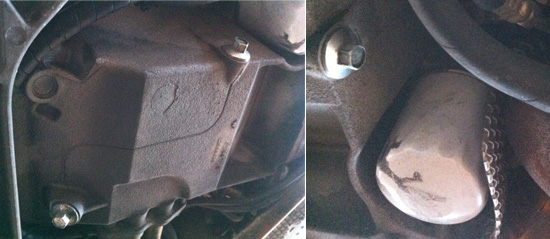
Once your car is sufficiently high enough you need to locate the two drain plugs on the oil pan (there is actually a line with two arrow pointing at them). You’ll need to remove both of them, but you can do it one at a time. Also locate the oil filter (see I told you space was tight). The one shown here was my old Mobile1 filter.

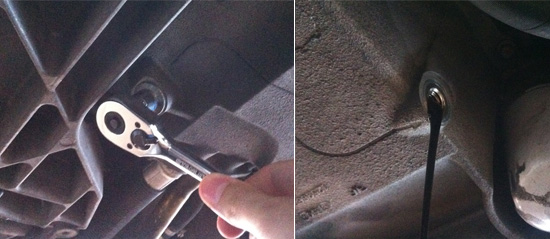
Position your oil reservoir below one of the plugs and loosen it. You may need to tap your socket wrench with the mallet or hammer to get it started. Remove the first plug and let the oil drain out. Remove the second plug and let it drain. Let the car drain until nothing comes out but small drops (usually takes about 10- 15 mins). I’m pretty sure most of the C6 Vettes have a magnet on the oil plug tips (it collects random debris floating around in the oil pan). Be sure to wipe off anything that’s been collected.

A quick lifting tip: I have two car jacks so I usually lift up the front end of my car when I start the oil change. But to make sure the car drains as much as possible I pull the jacks out of the front of my car and then move them to the back. Then I move the jacks back to the front. It sounds like a hassle, but it only takes a few extra minutes.

When the oil is all drained put the oil plugs back. The service manual recommends 18lbs of torque but I just tighten them snugly and I’ve never had an issue.

Next is the removal of the oil filter. Position your oil reservoir underneath (because more oil will be coming out). Using your oil filter wrench loosen the filter a bit and then let the oil drain for a moment. Then you can use the ZipLock bag and put it over the filter and unscrew it the rest of the way (yes, it unscrews forever).  Next you put on your new oil filter (some people fill it with oil, but this is optional). Be sure to rub a little bit of oil around the seal on the top of the filter. Screw it in by hand and then give it a quarter turn with your wrench. Be sure not to over tighten the filter.

That’s it for underneath. Wipe up any oil around the drain plugs, the oil filter and your used oil reservoir. Make sure everything is out from beneath your car and lower it to the ground.

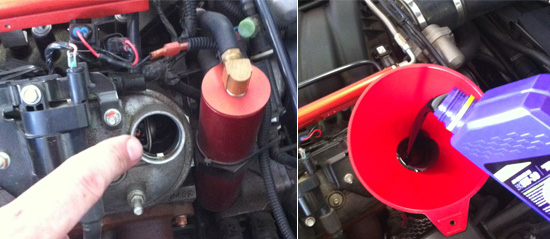
Pop your hood and locate the oil cap (it will say “Mobile 1”). The location varies between the coupes and the Z06. Make sure you’re putting the oil in the right place! Put in your funnel and dump in your oil (some people don’t add all the oil at this point, but I do- in fact I add a little extra since I have oil lines running to my turbos). Remember to put your oil cap back on!

Wait a few minutes and then start your car and let it idle for a few minutes. Keep an eye on your oil pressure gauge and look under the car for leaks. Turn off your car and check your oil dipstick to make sure your oil level is okay.

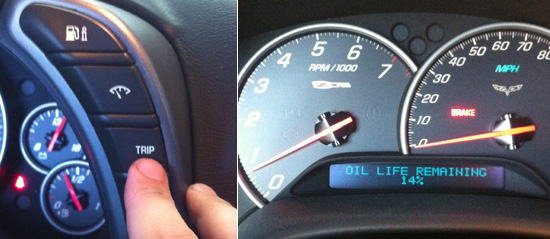
The next step it to reset the oil life indicator. Turn on your car and press the “Trip” button until you reach the “Oil Life Remaining” display.

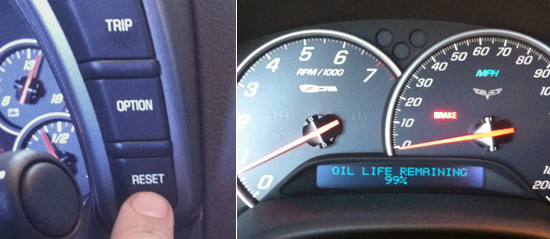
Then just hold the “Reset” button until the display shows “99%” oil life remaining. Some people will always change their oil after 3000 miles, but I wait until I have less than 20% oil life remaining.  For the most part I feel like you can trust the oil life gauge.

You can take your old oil to any AutoZone and they have a disposal unit you can use for free. Make sure to dispose of your other trash in accordance with your local laws. Clean up your work area, put away your tools and thump your chest.

You’re done! Let the smug satisfaction (stemming from the fact that you did it better than they would have done it) wash over you. Go for an “I’m the man” drive (check for oil leaks again when you get back). Taking good care of your car is an important part of Corvette ownership and there’s nothing better than doing it yourself.


Posted by Cam, August 28, 2011

My Car Rocks (How to Get Rocks Out of Your Body Panels)

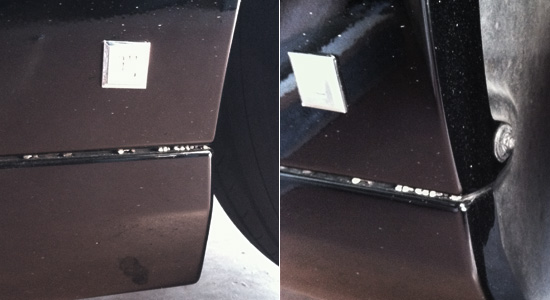
This is a post about rocks. Tiny rocks that get stuck between body panels near the rear tires. If you have a C6 Corvette chances are you know what I’m talking about. I’m not sure if this is a design oversight or if I just live in a place with way too many tiny rocks (and I will state again for the record that Utah roads are awful!). Anyway, here’s a quick little guide to get rid of your rocks so people don’t make fun of you!

The area where I see the most rock buildup is near the rear tires. Rocks actually get shot up over the wheel well casing, into the side wheel panel and drop down, getting stuck between the two body panels. Luckily getting them out is pretty simple.

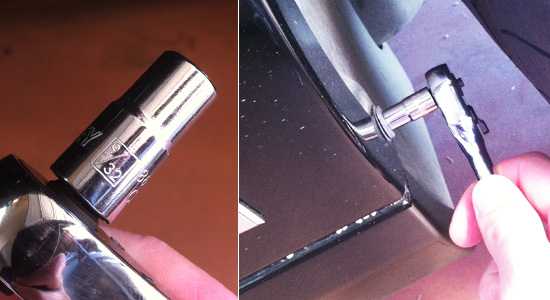
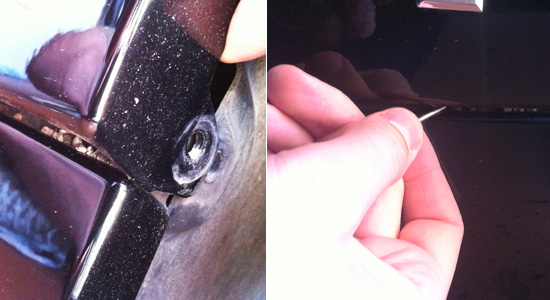
Grab your socket wrench and a 9/32 hex head bit.  Carefully loosen the screw shown (it’s the one opposite the rear wheel) and pull it out.

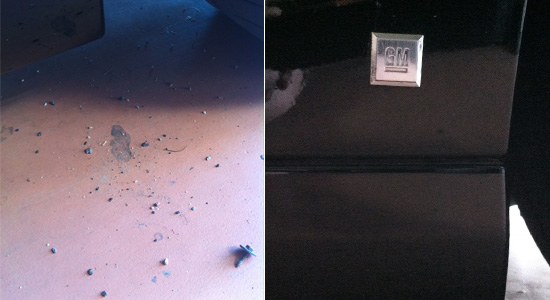
Gently pull out the body panel, separating it from the panel below. This creates a nice gap and you can use a toothpick, flat head screwdriver (anything, really) to carefully push out the rocks.

I usually have quite a few rocks (this is about two months of rock build up and I drive my car maybe100 miles a week). After you get everything cleaned out just push your panel back, put the screw in and voila! Good as new. Repeat on the other side.


Posted by Cam, July 1, 2011

On the Road Again (How to Remove Your Tires)

I finally got to take Vanessa out of a spin (my car’s name is Vanessa, remember?). We had a fabulous time cruising Utah County and blasting our favorite tunes (I’m only a little crazy). I really wish there were more places where I could drop the pedal and let loose. This car is built for speed and I really don’t get to take advantage of that. Sometimes I think maybe it’s time to get a new hobby… but then I go for a ride and fall in love again.

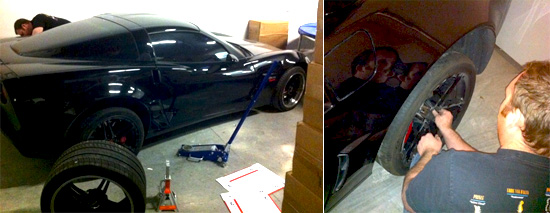
So yesterday I swung by work to help Jim swap his tires (the pictures below are his car, not mine). He’s got a set of Forgeline rims in the back and the leak. Not the tires- the rims. These particular rims are a three piece forged set and the leak is occurring where the pieces are bolted together. Yes sir, with this kind of performance even your rims need maintenance.

Anyway, I helped Jim swap his wheels off. Wheel swapping is pretty easy on most cars. Vettes with tires that are 12.5″ across and that weigh about 40 lbs are a little trickier. Just a quick set of instructions to help all you people who want to change their Vette tires (or any tires).

Items I recommend:
1. Car Jack (low profile)
2. Jack Pads
3. Torque wrench
4. Wrench extender (pictured in kit above- you may need this is your rims have deep lips).
5.  Wrench bit that fits your lugs (size will vary based on what wheel you have on your car).
5. Locking lug key (if applicable- sometimes nice wheels come with a special lug to deter theft).

Steps to remove / change tires:
1. Put your parking break on.
2. Underneath the car about to feet from the rear ties there is an oval hole. You can put your jack pad there or jack directly from this spot.
3. Carefully position your Jack and pump it up until it’s firmly in place, but don’t lift your car of the ground yet.
4. Loosen your lugs. Here’s a great article on wheel lug torquing, including how to loosen and tighten your lugs.
5. Jack the car up until the tire is off the ground. You can use a car jack stand if you can any concerns that your car might fall.
6. Finish loosening the lugs and remove them.
7. Firmly grip the tire and pull it off the vehicle (and remember, you can roll a tire- you don’t have to lift it to put it somewhere).
8. Give you rotor and brake calipers a little cleaning if you want
9. Lift on the new tire, light up the holes with the lug bolts, and refer to the torquing guide above again.
10. Remove you jack lift (if applicable), lower your car and repeat on the other side.
Remember: after you drive you car 50-100 miles you should tighten the lugs again!

Just in case you’re curious about why you’d be removing or changing tires, here a few good reasons:
1. You’ve got one set of street tires and one set of track tires and you need to switch them.
2. You’ve got a flat and you’re putting on a spare
3. Wheel maintenance (tire, rim, TPMS, etc).
4. Assembly maintenance (breaks, calipers, rotor, etc)
5. Left / Right tire rotation
6. Because you’ve got a sick idea of fun.

Anyway, now that the weather is a littler better (could we do something about these roads? They are awful!), batteries are charged and wheels are swapped maybe you’ll see us on the road again.


Posted Jan 30, 2011 by Cam Hughes