An Even More Awesome 1978 Corvette!!??

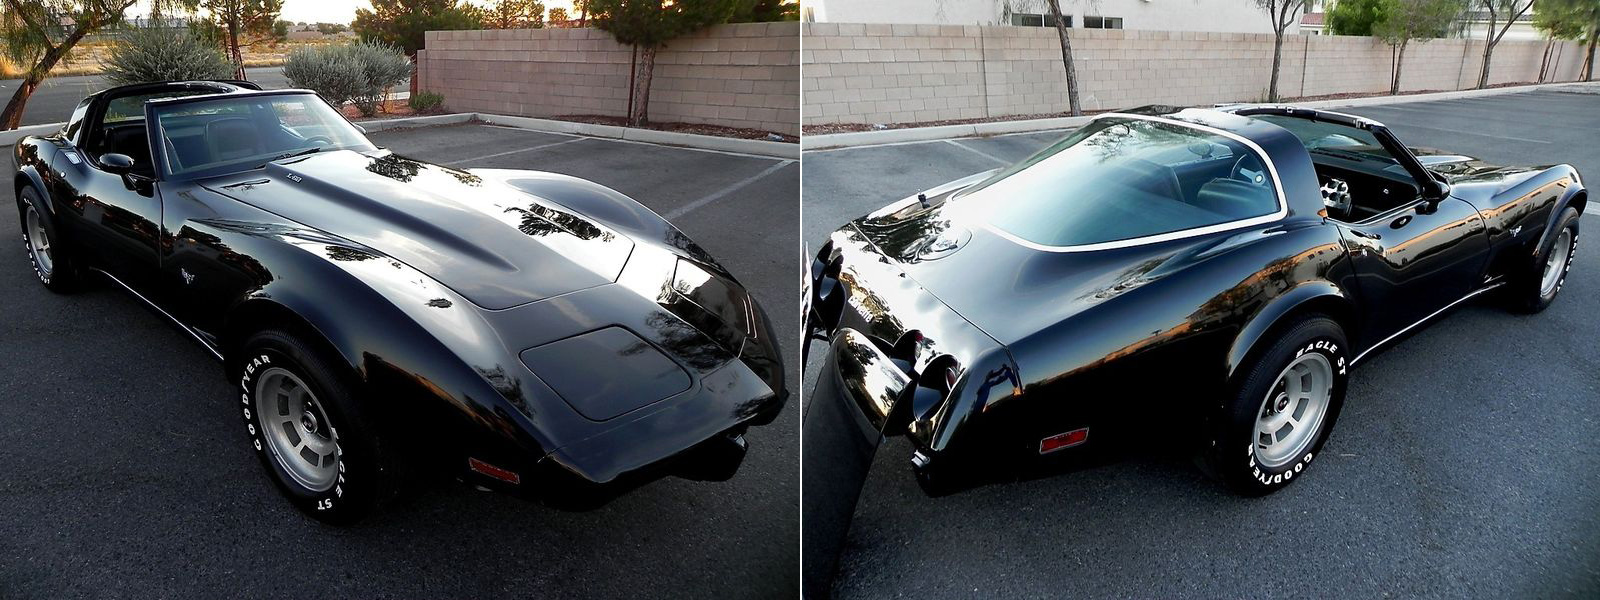
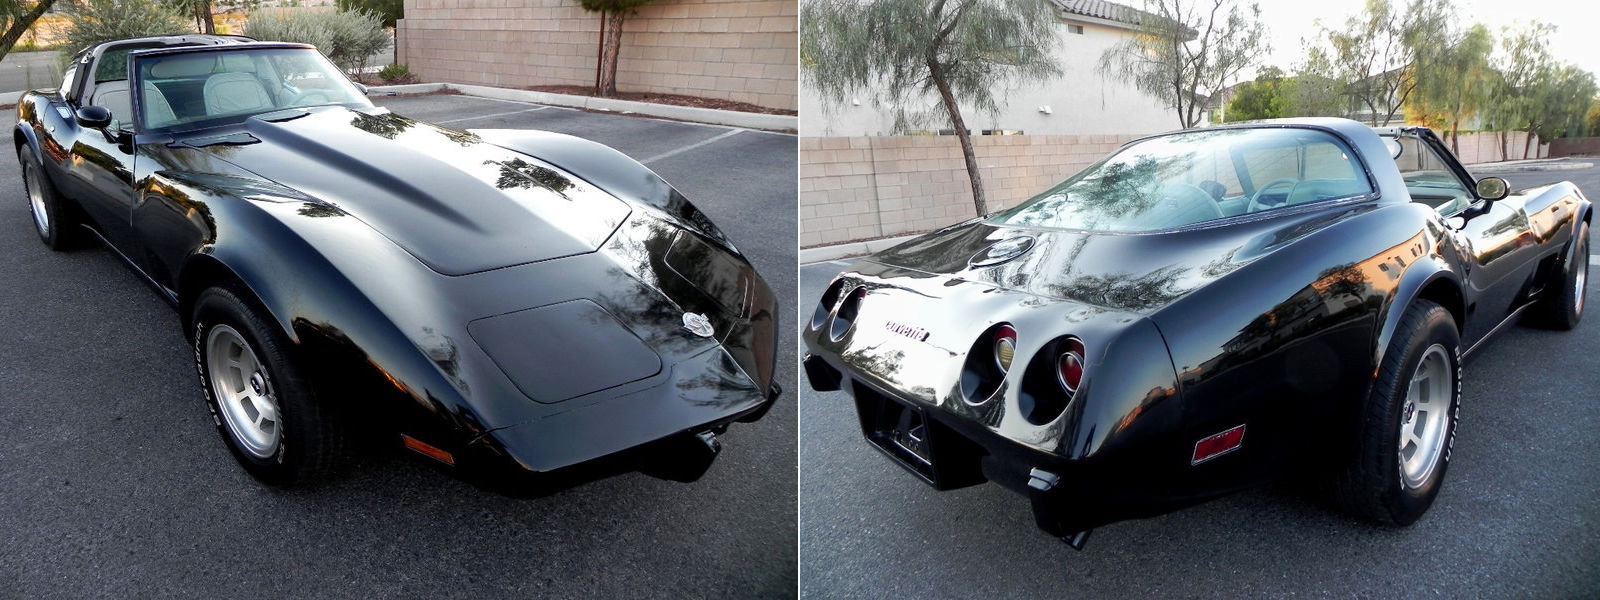
I really have to stay off eBay. Yesterday there was that beautiful ’78 Vette. It was a little tempting, but it wasn’t quite what I was looking for. If I could pick the perfect configuration I would have wished for a 1978 Corvette with a manual transmission (the other is automatic) and a black leather interior (the other had grey). Earlier today I noticed another 1978 Vette has been listed on eBay by the same seller as the other car. At first I thought it was the same car but soon realized this was another 1978 model with the exact specs I wanted. Ahhhhhh!

Do I need it? No. Do I want it? Yes. Would I love it? Yes. You just never know when the perfect thing will pop up on eBay. A car like this may roll around every few years or you may never see one again. What to do, what to do…

Gotta let this one slide. As I mentioned in my last post I already have way to much to do and taking care of another car would be a pain.  Besides, if I’m going to spend the money I’d rather put it into the car I already have (is there an LSX block in my future?). Maybe one day…


Posted by Cam, September 21, 2011

Awesome 1978 Corvette!!

I don’t know why, but every so often I go to eBay and search for Corvettes. In addition to turbo and supercharged Vettes I always look for black 1978 Corvettes. For some reason or another I am hung up on the idea of driving around a car that was “born” in the same year as me.

Lo and behold, I ran across this beauty the other day! I toyed with the idea of getting it (I thought it was a steal at around $10K) but I don’t have any place to put it and I don’t have time to work on it. It sold pretty quickly and I think the new owner is going to have a blast. Anyway, I just wanted to share this awesome ’78 Vette.

Maybe one day…


Posted by Cam, Spetember 21, 2011


Home, Moved & Settled In.

Anyone who has ever moved knows it can take forever to settle in. It’s easy enough to deposit your junk in a new location but finding the right spot for it and creating a good feeling in your new environment can be challenging. Ever since I moved my car back home I’ve been working on getting things in my new location organized. I think I’ve finally done it and consider myself settled.

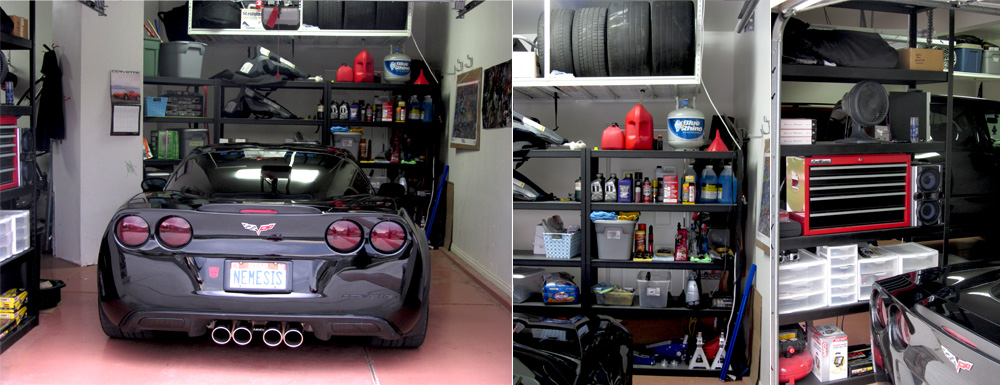
I spent this past weekend sorting tools, separating cleaning supplies and car parts, adjusting shelves and shifting stuff around until it fit just right.  I was able to put my old set of tires on the storage rack above the back shelf (I don’t swap tires often so it works pretty well). The back shelf turned out really well and I’ve got the shelves organized by car fluids, cleaning supplies and jacks. My side shelf is organized by tools, books and car parts. I crammed in a Sony Stereo & a fan too.  I even hung my old license plates on the wall (yeah, for real). 

I’m really happy with the results. In fact our whole garage is pretty organized these days. Maybe it seems silly, but it brings me a great deal of satisfaction that we can actually fit three cars into our three car garage. I’m often shocked when I drive by houses and see the second or  third car garage crammed with junk (or worse stuff spilling out from every garage). If you have that much stuff get rid of some or get a storage unit. I’ve always felt the garage is just another room in the house and should be kept neat & clean.

Anyway, now I’m home, moved and settled in. Feels good! Now we just have to finish settling into our house…


Posted by Cam, September 10, 2011

Wax On, Wax Off (How to Prepare & Wax Your Car)

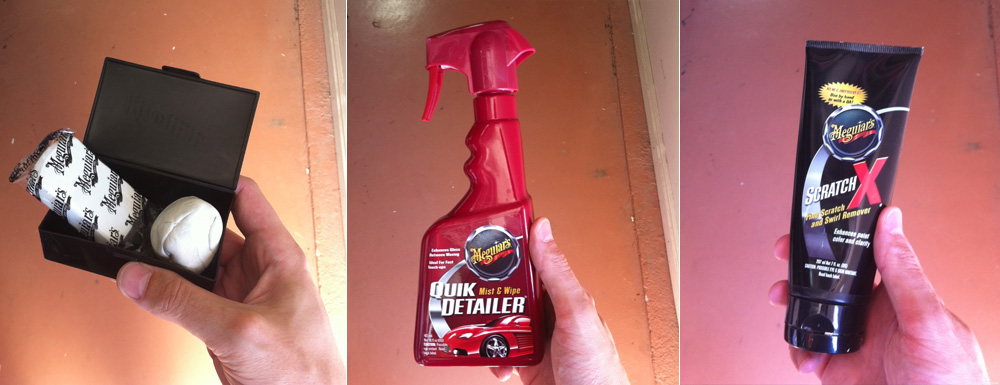
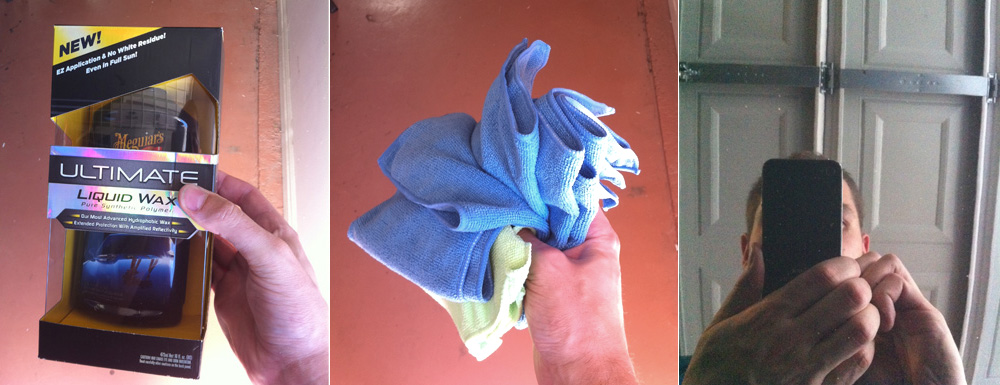
The other day I decided to really clean my car’s exterior. I gave it a quick wash and did a thorough inspection of the body to look for scratches, bonded containments and stains. There were actually quite a few, so I decided to make a quick pit stop at AutoZone. I generally use supplies from a company called Meguiar’s and overall I’m really pleased with their cleaning products (no one has paid me to say this- I wish!). Here’s what I used for my project:

1. Meguiar’s Smooth Surface Clay
2. Meguiar’s Quick Detailer spray
3. Meguiar’s Scratch X 

4. Meguiar’s Ultimate Liquid Wax
5. Lots of microfiber towels! You can use cotton terry cloth if you want too, but I don’t care for it personally.
The last picture in the sequence below is actually a reflection. I took the picture with my iPhone pointed and the car to show the finished results. Just for the sake of science I also took pictures in the reflection of my freshly waxed black truck (very little prep work and a different wax though).  No comparison; the rich glossiness of my Vette is unreal.

For the car wash I just go to the local Pay ‘n Spray (that’s not what it’s actually called) and I use their water & soap. I don’t feel like I need to spend big bucks to spray off the road dirt. After the rinse I toweled  off my car and got to work.

I scoured the car for light scratches, stains (bird poop is nasty stuff- it can leave residue that will not wash off), and scuffing. Scratch-X is perfect for this kind of light damage. Just put a bit on the affected spot and buff away.

After the Scratch-X I moved on to the clay. You need to make sure the area you’re working on is lightly lubricated. I sprayed on some Quick Detailer and then rubbed the clay over the misted areas. Clay is cool stuff- it will actually pull out any little particles that have bonded to your car (the stuff that washing won’t get rid of). People may not realize it, but the surface of your car should be perfectly smooth to the touch. If there are any tiny little bumps or any kind of grittiness to your finish the clay will remove them.

After the clay it was time to wax. I like to wax my car by hand and listed to music- I find it very therapeutic.  This was my first time using liquid wax and I thought it was pretty convenient and it applied easily. What I really like about Ultimate Liquid Wax is that it rubs on nearly clear (in other words, it didn’t leave that yellow goo in the cracks of my car). When I went to polish off the wax I got a shock- it took a lot of extra effort beyond what I’m used to. I had to buff it hard in order to get maximum consistency and gloss. Taking it off was more work than putting it on!

But the finished results were well worth it. Proper preparation is essential to achieve the best results.  I don’t think I’ve ever seen my car look this good. But now I have to detail the wheels, engine bay and interior! It must be love.


Posted by Cam, September 10, 2011


Miscellaneous Stuffery.

1. I’ve been doing a fair amount of blogging lately but most of my recent posts are on www.utahcorvette.com. I’ve spent quite a bit of time on my hobby these past few months and I’m sad that the nice weather is on its way out.  I need a good winter hobby… Maybe I’ll pull out my engine and rebuild it. Ha, I always think that.

2. Also, for work related stuff check out CamOnCommerce.com. I don’t update is as often as I used to because I discovered that some of our competitors read it. There’s nothing super confidential (even the password protected stuff is pretty benign), but I’ve decided I need to keep it that way. I’ll be doing a post in the next couple of weeks about our growth though. I’ve got some awesome news.

3. I have been updating DoomCloud.com each day, but some people probably miss it. Check out my “Daily Regimen” tab. I’m posting my diet & exercise for the next 60 days. Sometimes reading over what I eat makes me sad… But overall I think I’m making really good progress. If you’ve ever wanted to lose some weight or get in shape start now (like this instant). 

3. Speaking of DoomCloud.com. In the future if anyone builds any links to me please build them to CamHughes.com (and use the link text “Cam Hughes”). Much appreciated! Also, for all you adoring fans who have a hard time remembering my web address (and who refuse to use bookmarking technology) there is now another way to get to my amazing blog: CamsBlog.com. Because it was too hard before, right?

4. Overall, life is pretty good right now. Our 4th little bundle of joy is due in the next couple of weeks. The other three kids are all in school now and getting more and more exciting each day.  Kids grow up so fast. Cherish each moment with them! Be sure to visit Fran’s blog (FrancoiseHughes.com) for more family goings ons ings…


Posted by Cam, September 7, 2011


How to Remove Your Corvette C6 Center Console

I have been meaning to make this post forever! When I was putting in my stereo I had to take out my center console about four times over the course of the installation. And then I had to take it out twice for the new clutch. During one of the removals I snapped some pictures. A  few of them turned out blurry so I’ll redo them next time remove the console (which might be this year- I have a few stereo tweaks that I want to do).

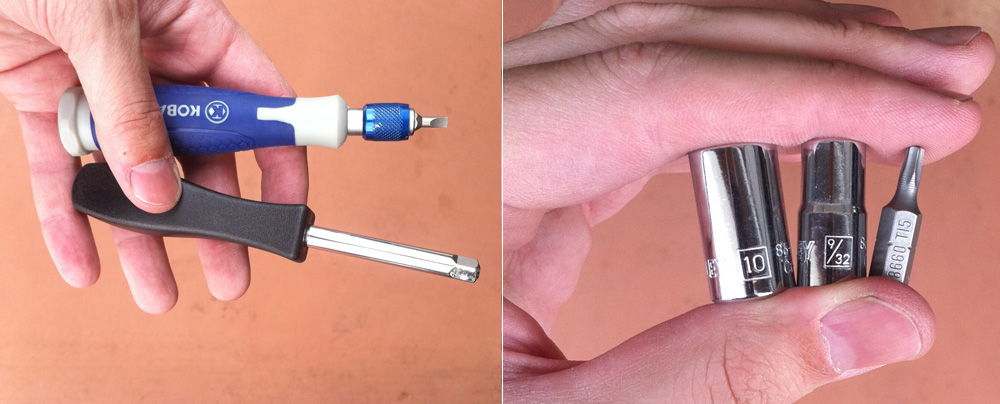
There are tons of reasons you may need to pull of your center console: Access to your stereo, climate controls, shifter, internal wiring, etc. If you want to try it yourself  just follow the instructions below (these are specifically for the C6 Z06 but should also work for coupes and convertibles). You’ll need a T15 Torx bit and driver as well as  9/32 & 10mm hex head socket bits andand  additional driver.  Also recommended is a small flat head screw driver. Be sure to keep all the small parts together (your bits, the removes screws, etc).

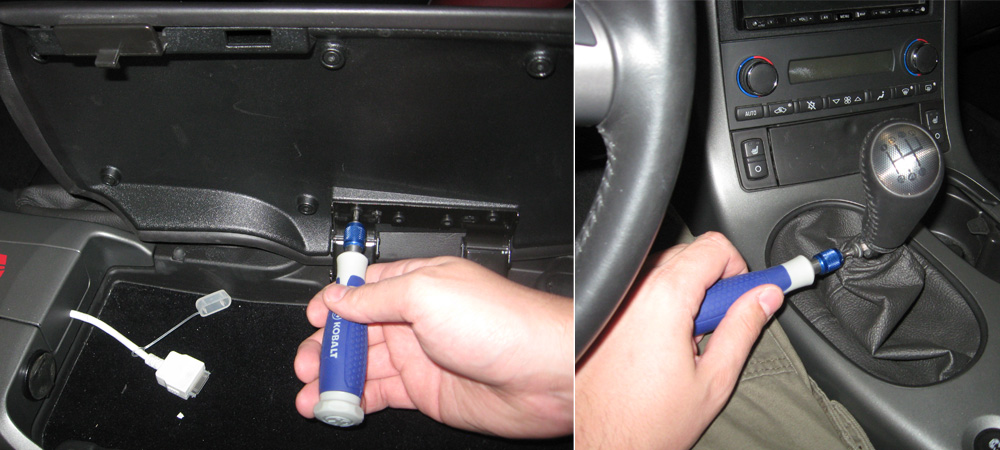
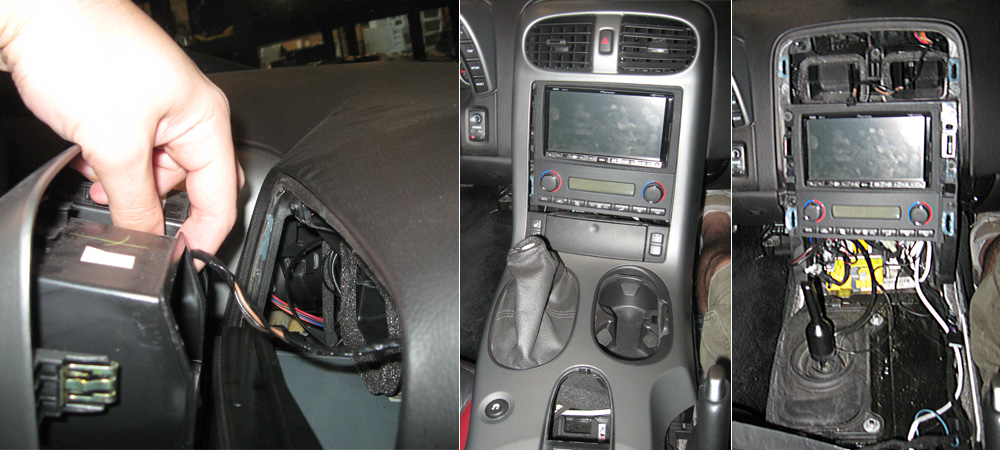
I recommend taking off the console cover. It makes it easier to get at some of the screws later and it’s nice to have it out of the way while you work. Unscrew the four Torx screws (Torx T-15) and set the cover aside. Next remove the shift knob (also Torx -15). If your shift knob is stock then just remove the Torx screw as show  and pull the knob off (f you have an automatic there’s nothing you need to do-  the console simply lifts off over the shifter)

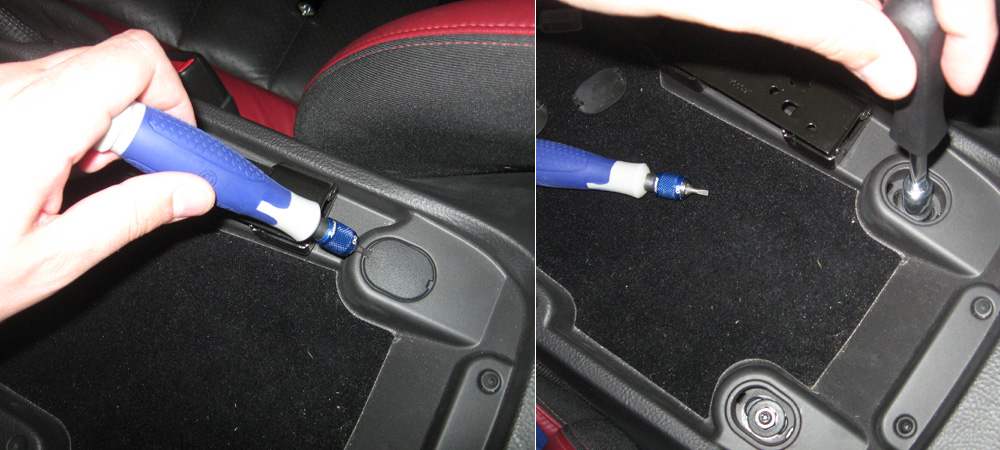
You will need to remove three hex nuts on the console. The first two are near the rear of the console.  Simply pop off the plastic covers with a flat head screwdriver and uncrew the nuts (10mm bit). [If you’re not pulling out the main part of the center console you do not have to do this step!]

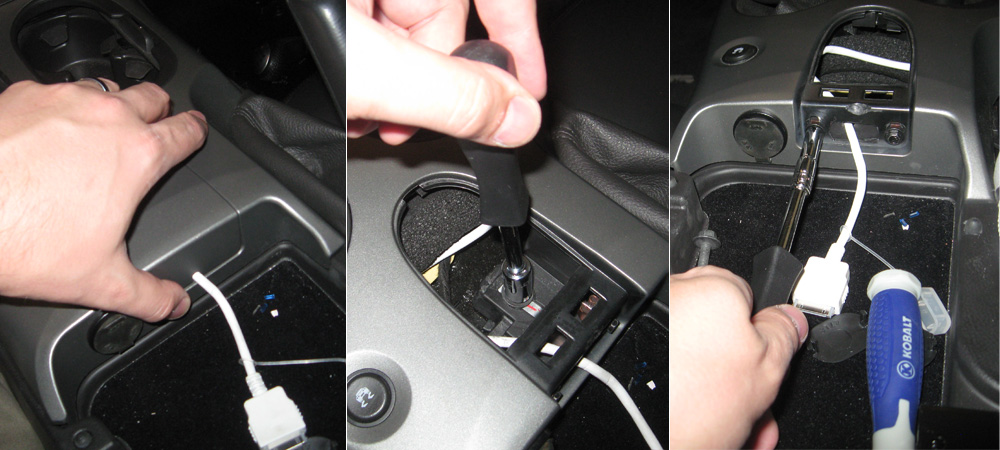
The third hex nut is under the middle potion of the console. Use your thumb to apply pressure on the plastic cover and pop it out (it’s held in by two clips). Remove the third nut as shown. Now you need to remove the two smaller hex screws (9/32 bit) as shown. The white cord you see is for my iPod- you probably won’t have anything hanging out here.

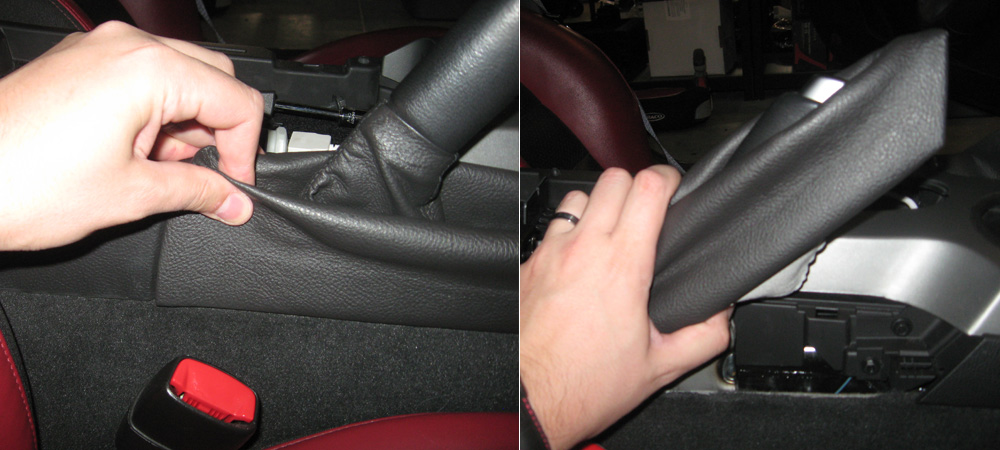
The next step is to carefully pull up the hand break boot. Grasp the boot carefully but firmly and pull it up.  The clips that hold it on will release with relative ease. Move the boot out of the way (it won’t come all the way off).

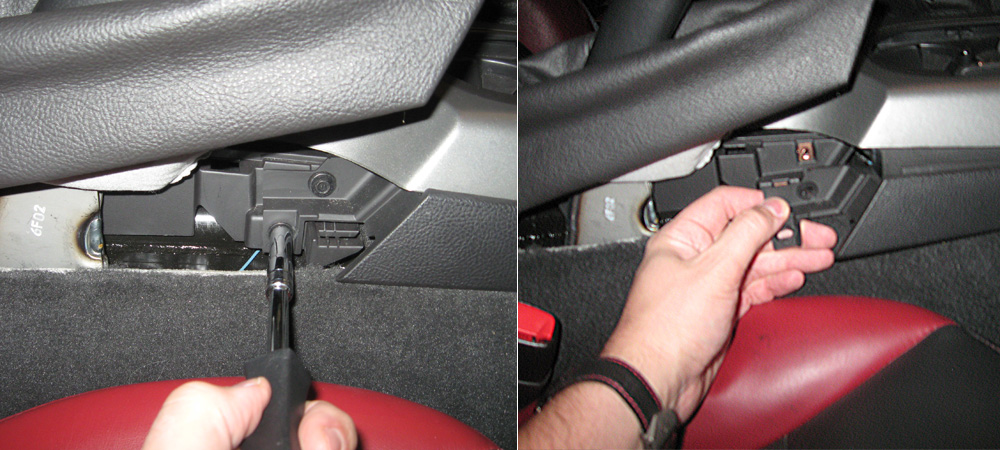
There are two more hex screws (9/32 bit). When these screws are gone you can start removing the piece of trim that runs along the bottom of the console.

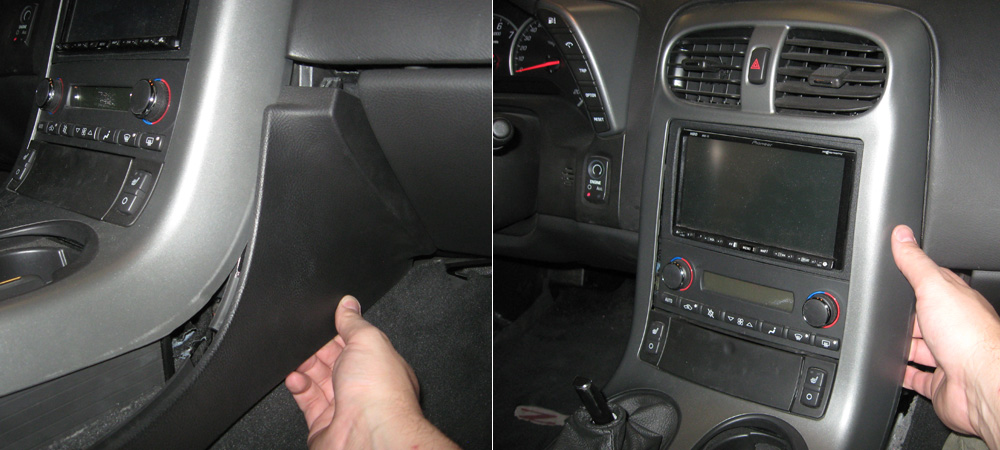
Carefully pull the trim out (you can rock this piece downward a little). Near the glovebox the trim is secured by two clips. You should be able to get a good view of them- they’re pretty sturdy so don’t worry too much about breaking them when you pop the peice out. With the trim removed,  slide your hand behind the main console and pull. This whole center piece simply pops out (again secured by clips). Try and work your hand around the console head and pry it out little by little (you don’t want to apply too much pressure to any one area or it could crack).

Once the head piece has been pulled out don’t try and lift it off yet! You now have to disconnect the the wiring harnesses. This can be fairly tricky and I confess that I don’t have pictures  that show the details of this process. Most of the harnesses have a tab that needs to be pushed down allowing the two halves of the harness to separate. There’s limited room to work but your flat head screw driver should come in handy here (and hey, when you get eveything apart take a moment to bask in your awesomeness).  In all there can be up to six harnesses that you need to unhook. 1) Hazard lights 2) Heated seats (two of them, if applicable) 3) Two cigarette lighters, 4) traction control button.

And that’s about it. Once everything is disconnected carefully lift off the whole console (it helps to have your shifter in neutral). And when you’re ready you can put it back on in the opposite order of the way you pulled it off. Remember to hook everything back up (it sucks to forget something). If anyone has any questions or needs clarification on a certain step please feel free to let me know and I’ll be happy to help. Again, next time I do this project I’ll try and replace the fuzzy pictures and even try and get some close-ups of the wiring harnesses. Best of luck!


Posted by Cam, September 5th, 2011

Corvette C6 Z06 – How to Change Your Oil

When it comes to my car I don’t like to take any chances. I do as much of the maintenance as I can myself. So, naturally, I change my own oil. This time I decided to put together a little “how to” guide. If you’re not comfortable working on cars then I suggest you take your vehicle to a competent service center. These instructions are only applicable to C6 model Corvettes (specifically the Z06). Any work you choose do to on your car is done at your own risk. So, let’s get started!

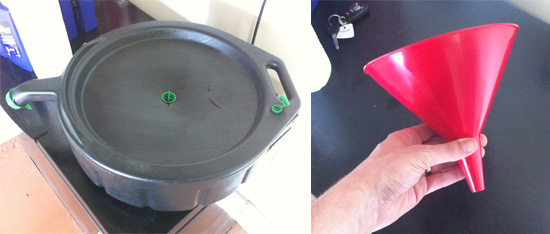
There are a few things you’re going to need. 1) An oil reservoir for used oil (at lest 10 quarts). You can get these pretty much anywhere that sells car care items for around $10. I’ll tell you what to do with your used oil later on. 2) A funnel. I recommend a 2 quart funnel for your oil. These are about $1.

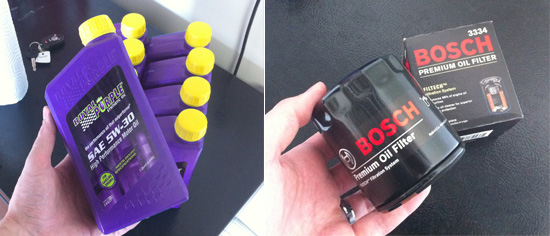
3) 8 quarts of 5W-30 oil (I use Royal Purple). I feel like I need full synthetic w/ my engine modifications but any oil that meets GM’s guidelines can be used. 8 quarts is for the Z06; If you have a coupe refer to your service manual. 4) New oil filter. I just switched to the Bosch 3334 this time so I could use a different kind of filter wrench (more on that in a sec). Anyone competent at a place like AutoZone can help you determine which oil filter you need if you pick a brand other than Bosch.

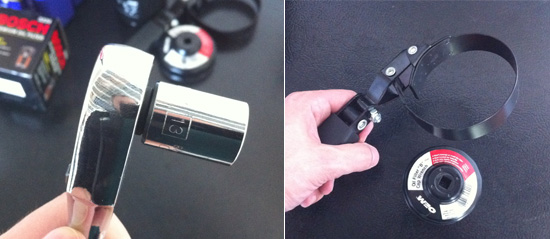
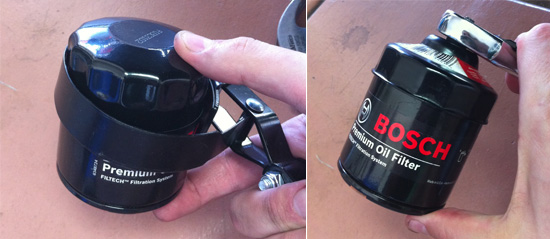
5) Socket wrench with 13mm head. This will be used to loosen the oil drain plugs. 6) Oil filter wrench. The band wrenches are good, but space around the oil filter can be limited (like on a C6) so I switched over the Bosch filter because I can use the attatchment below on a socket wrench and it’s much easier.

Here are two examples of how the wrenches fit over oil filters.:

7) Rags & paper towel. No matter how careful you are oil is going to spill onto something. 8 ) Here are some optional items you might want to have handy: mallet or hammer & 1 quart ZipLock bag.

So to recap here’s what you need for your oil change:
1) Oil reservoir (at least 10 quarts)
2) Funnel (2 quarts)
3) 8 quarts of 5W-30 oil
4) New oil filter
5) Socket wrench with 13mm head
6) Oil filter wrench
7) Rags
8 ) Mallet or hammer, ZipLock 1 quart bag (both optional)

Please note: This guide doesn’t cover how to lift up your car (see my “How to Lift Your Car” guide coming soon). But you will have to lift your car or have a pit to change the oil on the C6.

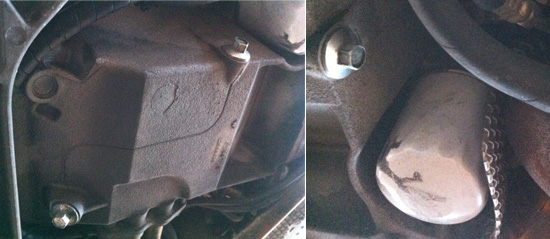
Once your car is sufficiently high enough you need to locate the two drain plugs on the oil pan (there is actually a line with two arrow pointing at them). You’ll need to remove both of them, but you can do it one at a time. Also locate the oil filter (see I told you space was tight). The one shown here was my old Mobile1 filter.

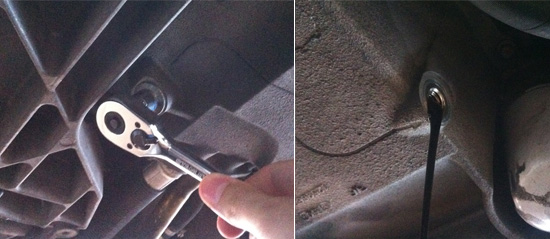
Position your oil reservoir below one of the plugs and loosen it. You may need to tap your socket wrench with the mallet or hammer to get it started. Remove the first plug and let the oil drain out. Remove the second plug and let it drain. Let the car drain until nothing comes out but small drops (usually takes about 10- 15 mins). I’m pretty sure most of the C6 Vettes have a magnet on the oil plug tips (it collects random debris floating around in the oil pan). Be sure to wipe off anything that’s been collected.

A quick lifting tip: I have two car jacks so I usually lift up the front end of my car when I start the oil change. But to make sure the car drains as much as possible I pull the jacks out of the front of my car and then move them to the back. Then I move the jacks back to the front. It sounds like a hassle, but it only takes a few extra minutes.

When the oil is all drained put the oil plugs back. The service manual recommends 18lbs of torque but I just tighten them snugly and I’ve never had an issue.

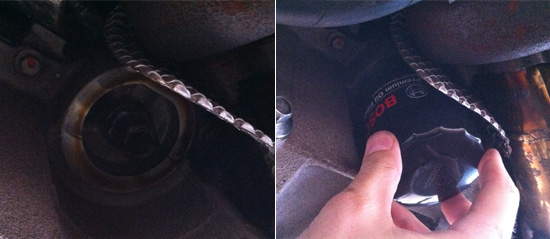
Next is the removal of the oil filter. Position your oil reservoir underneath (because more oil will be coming out). Using your oil filter wrench loosen the filter a bit and then let the oil drain for a moment. Then you can use the ZipLock bag and put it over the filter and unscrew it the rest of the way (yes, it unscrews forever).  Next you put on your new oil filter (some people fill it with oil, but this is optional). Be sure to rub a little bit of oil around the seal on the top of the filter. Screw it in by hand and then give it a quarter turn with your wrench. Be sure not to over tighten the filter.

That’s it for underneath. Wipe up any oil around the drain plugs, the oil filter and your used oil reservoir. Make sure everything is out from beneath your car and lower it to the ground.

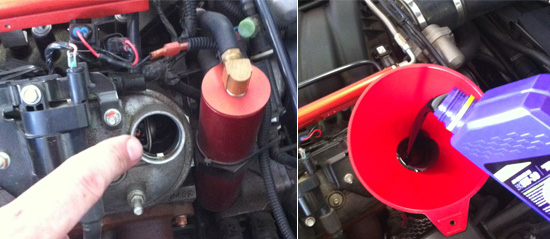
Pop your hood and locate the oil cap (it will say “Mobile 1”). The location varies between the coupes and the Z06. Make sure you’re putting the oil in the right place! Put in your funnel and dump in your oil (some people don’t add all the oil at this point, but I do- in fact I add a little extra since I have oil lines running to my turbos). Remember to put your oil cap back on!

Wait a few minutes and then start your car and let it idle for a few minutes. Keep an eye on your oil pressure gauge and look under the car for leaks. Turn off your car and check your oil dipstick to make sure your oil level is okay.

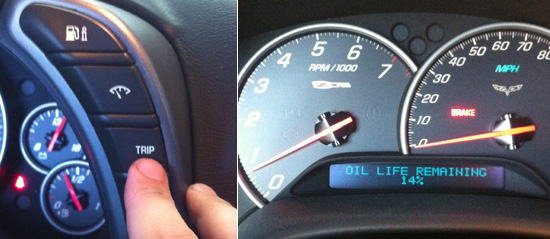
The next step it to reset the oil life indicator. Turn on your car and press the “Trip” button until you reach the “Oil Life Remaining” display.

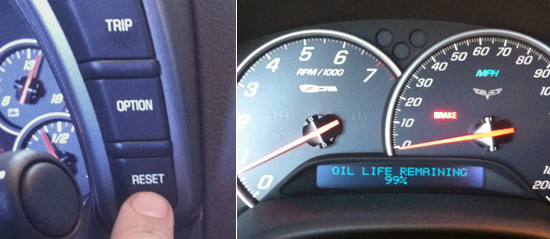
Then just hold the “Reset” button until the display shows “99%” oil life remaining. Some people will always change their oil after 3000 miles, but I wait until I have less than 20% oil life remaining.  For the most part I feel like you can trust the oil life gauge.

You can take your old oil to any AutoZone and they have a disposal unit you can use for free. Make sure to dispose of your other trash in accordance with your local laws. Clean up your work area, put away your tools and thump your chest.

You’re done! Let the smug satisfaction (stemming from the fact that you did it better than they would have done it) wash over you. Go for an “I’m the man” drive (check for oil leaks again when you get back). Taking good care of your car is an important part of Corvette ownership and there’s nothing better than doing it yourself.


Posted by Cam, August 28, 2011

July Goings Ons… ings.

I don’t generally blog about family stuff (it’s on Fran’s blog, remember?) but I did a couple of fun things with the family this month that I thought posterity would be interested in so I have included them.

Fourth of July Weekend

Each year we go to BYU campus and sit and watch the fireworks. We’ve gone to the Stadium of Fire before, but we decided we like watching the free fireworks more than being inside.  We have a fun little tradition these days. We actually rent a hotel room (this year we hit Best Western) and go live it up up in the afternoon (relaxing, pool, some TV, whatever). Then we go eat dinner while everyone else scrambles to get inside the stadium. You can eat anywhere, no wait. We went to Saigon Cafe this year- love that place.  Around 9:30 we walk over to BYU and find a spot where we can see the fireworks. The show usually starts around 10:15. This year it seemed extra awesome. The kids are old enough that they can almost make it though the show now without crying. Almost.

And then over the next few days we lit off fireworks at home. The kids love the smoke bombs, snakes, crackle balls and snap pops so I loaded up on extra boxes at WalMart (they actually have an okay selection of fireworks). My family came over for a Fourth of July BBQ (hot dogs, hamburgers and lots of chips & dip). Later that night we lit off our own fireworks. It was actually raining, so we sat under our gazebo and lit them on the concrete pad in our backyard. It worked really well and we had a fun time. The kids are all big enough that they they want to take turns lightning thing (well, to clarify – they all want to light everything, but we make them take turns).

Side Note: Aerial fireworks are now legal in Utah. I didn’t get any myself (it is my cheapness? I don’t know), but we got to enjoy them anyway (many neighbors invested). They are awesome.

New Trampoline

Our old trampoline had been mangled, cut, repaired, slashed, and the springs died sometime last year. It served us well for over five years, but it was time for a new one. Luckily, I just happened to have one at my work and luckily I had to remove it because we needed the space.
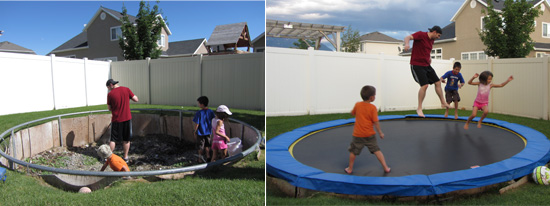
I brought it home over the Fourth of July weekend and finally got a chance to set it up a few days ago. Our trampoline hole is in pretty bad shape, but we cleaned it out, rearranged the rocks, pounded in some rebar and then put the new trampoline mat, springs and pads on the old frame (there was no way it was coming out and it’s still in good shape). What a difference a new trampoline makes! I played with the kids for a couple of hours and then spent the next few days in serious old man pain. 

Side Note: I highly recommend Regal Trampolines. Their trampolines really are top quality and have superior components. The junk you get at places like Toys R Us or Walmart just doesn’t compare.

Herman’s Hermits Concert

Last weekend we went to see Herman’s Hermits at the Sandy Amphitheater. My Dad has a longstanding love for 60’s bands, (i.e. Turtles, Paul Revere and the Raiders, etc) and he graciously extended the invitation to see Herman (who’s real name is Peter Noone) with him. He prepared the kids by having them listed so some of the Hermits greatest hits (Henry the Eighth, There’s a Hush, Mrs. Brown, You’ve got a Lovely Daughter and the like). They were pretty exited to see “Herman.” My Dad scored us some seats in the first section of the lawnchairs. They were right in the center, they were comfortable, and we had a great view.
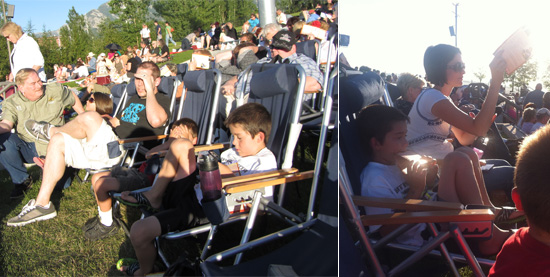
The show was really good. Peter is 63 this year but he’s energetic and very entertaining.  The Hermit’s songs have a timeless quality (I grew up listening to them) and I really enjoyed myself. The crowd consisted of mostly people Peter’s age, but there were a fair number of younger fans as well (I think I can count my kids as “fans” now too).  Hopefully we get a chance to see another concert in the near future. Thanks Dad!

Moving Stuff

We’ve also done a fair amount of “terraforming” at our house. Besides my garage project (see it @ utahcorvette), we spent a good deal of time rearranging our basement. We moved the video games out of the rec room* and  into the basement family room. Stuffed into a corner by the pool table our rec room gaming center  was awkward and very cramped (we had to sit in folding chairs). Our new setup is neat, comfortable (we have a couch to sit on now) and  feels spacious. Check out the before & after pics below and click here if you want to see the new set up in more detail. I love moving stuff around!
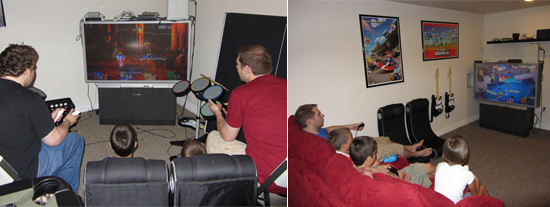
I keep reading online articles about people who saved thousands of dollars a year by not doing things. “We saved $3,000 this year! We were going to take a vacation, but we didn’t!” or “We saved $1500 this year by not repainting our deck and letting our lawn grow into a jungle.” Some of it comes off as ridiculous. Well, I’m pleased to report that by this logic I saved $1370 on this game room project. I had budgeted $1450:  A flat screen TV ($1000), a new entertainment center ($300), and a Blu-Ray player ($150). Instead we used our old TV ($0), I got a wall shelf ($36), some hooks ($4), two framed posters ($40), and we decided to make due with no BluRay player ($0). Wow! By Internet standards we are super frugal.

* We’re turning that into more of a library- still a work in progress, so more on that later.

Pioneer Day

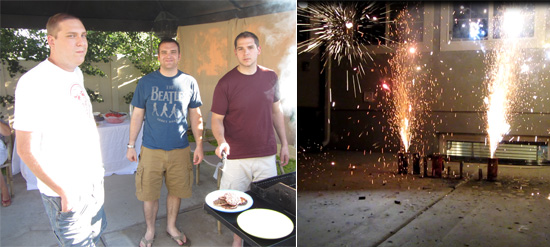
This year we celebrated Pioneer day with the Browns- both sets. The men stood around the grill doing and saying very manly things. Jim & Cindy had to take off early, but Tom & Aimee stuck around for fireworks. We exploded them dangerously close to our home to heighten the sense of pyrotechnic excitement.  I think Fran will blog about Pioneer day in more depth.
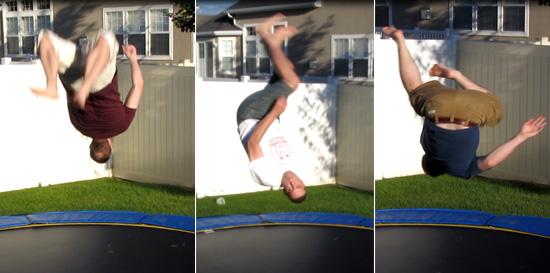
Oh, and of course the most important part of any get together: the show of bravery, stamina and general lack of common sense. With a aforementioned trampoline now place we had everything we needed. We each took a turn inverting ourselves, playing “back to front” and then “spin to win.” Ultimately we were forced to conclude that we were not as young as we used to be.
10th Anniversary!

On July 28th, 2011 Fran and I celebrated our 10th wedding anniversary! We went to Ruth’s Chris (kind of our anniversary tradition) and spent a quiet evening together. We had planned to go to Hawaii, but with a little one on the way (yes, number four is seven months along) we decided to postpone it. I got Fran an anniversary band with ten diamonds (I got something too, not to worry). I don’t get to buy Fran jewelry very often (her choice) so I think I was as excited as she was. Needless to say, Francoise is my best friend, a wonderful wife and a stellar mom and it’s been a wonderful ten years!


Other notable July events:
Rachel’s Birthday
Jason’s Birthday

Erin’s Birthday (she turned 30!)
The Jorgensens move to Seattle (Andrew needs to blog about this!)


Posted by Cam Hughes, July 30, 2011